
Data loss remains one of the most stressful experiences a computer user can face, whether caused by hardware failure, accidental deletion, or something more sinister like ransomware. In 2026, GNU ddrescue remains the gold standard for low-level data recovery on Linux — a battle-tested tool that has been actively maintained for over two decades. This guide walks you through the full recovery workflow on Ubuntu Linux: diagnosing your drive with smartctl, visualising your disk layout with GParted, and performing the actual rescue with GNU ddrescue. Where relevant, we also cover DDRescue-GUI, a paid graphical front-end that makes the process considerably more approachable.
TL;DR — GNU ddrescue provides the most reliable way to copy as complete an image as possible from a failing drive, minimising the risk of catastrophic data loss. Before you reach for it, though, check your drive with GParted and smartctl from smartmontools. If the drive is actually healthy, you may be able to simply mount it and copy your files the normal way — no imaging required.
Contents
- What's changed in 2026
- Step 1: Diagnose the drive with smartmontools
- Installing smartmontools
- Checking your drive
- Step 2: Identify your drives with GParted
- Installing GParted
- Step 3: Recover your data with GNU ddrescue
- Installing GNU ddrescue
- Using ddrescue safely
- Let tools finish
- Never use mounted partitions
- Copy first, repair later
- Identifying your block devices before you start
- Running ddrescue from the command line
- DDRescue-GUI: a graphical option
- An example recovery with DDRescue-GUI
- Conclusion
What's changed in 2026
The core workflow described in this guide has remained stable, but a few things are worth flagging for anyone returning to this topic after a gap, or arriving here for the first time in 2026.
- GParted is now at version 1.8.1 (GParted Live 1.8.1-3), bringing improved support for modern partition layouts and NVMe drives.
- DDRescue-GUI is now at version 2.2.0 and has accumulated over 156,000 downloads. It remains a paid download but is available across Linux (Ubuntu and Fedora via PPA), Windows 8.1+, and macOS 10.10+. Note that macOS 10.14 Mojave and 10.15 Catalina have known compatibility issues with this release, and a future version is planned to add native Apple Silicon support without requiring Rosetta 2.
- Ubuntu LTS users should be aware that the packaged version of
gddrescuein the repositories may trail the upstream release. For most recovery scenarios this is fine — stick with the distribution-provided version unless you have a specific reason to upgrade. - The focus of this article is
smartmontools, GParted, and GNU ddrescue. DDRescue-GUI is covered as a convenience option, but the underlying tools are what matter.
Step 1: Diagnose the drive with smartmontools
smartctl is the command-line interface to the Self-Monitoring, Analysis and Reporting Technology (SMART) system built into most ATA/SATA, NVMe, and SCSI/SAS hard drives and solid-state drives. SMART monitors drive reliability, predicts failures, and can run self-tests. Running it first tells you whether you actually have a failing drive — or whether you are dealing with a software or filesystem problem on an otherwise healthy disk.
Installing smartmontools
$ sudo apt update && sudo apt install smartmontoolsChecking your drive
Use the correct /dev device path for your drive. The -x flag prints all available SMART and non-SMART information about the device and is the most comprehensive starting point.
$ sudo smartctl -x /dev/sdaYou are looking for an overall health assessment and any error counts. A healthy drive looks like this:
SMART Status:                        0xc24f (PASSED)
...

SATA Phy Event Counters (GP Log 0x11)
ID      Size     Value  Description
0x0001  2            0  Command failed due to ICRC error
0x0002  2            0  R_ERR response for data FIS
0x0003  2            0  R_ERR response for device-to-host data FIS
0x0004  2            0  R_ERR response for host-to-device data FIS
0x0005  2            0  R_ERR response for non-data FIS
0x0006  2            0  R_ERR response for device-to-host non-data FIS
0x0007  2            0  R_ERR response for host-to-device non-data FIS
0x0008  2            0  Device-to-host non-data FIS retries
0x000b  2            0  CRC errors within host-to-device FIS
0x000d  2            0  Non-CRC errors within host-to-device FIS
0x000f  2            0  R_ERR response for host-to-device data FIS, CRC
0x0010  2            0  R_ERR response for host-to-device data FIS, non-CRC
0x0012  2            0  R_ERR response for host-to-device non-data FIS, CRC
0x0013  2            0  R_ERR response for host-to-device non-data FIS, non-CRC
A status of PASSED and zeros throughout the error counters indicate a healthy drive. If that is what you see, you do not need GNU ddrescue at all. Use GParted to confirm the drive is visible, mount it, and copy your data to a safe destination using your normal file manager or the command line. Consider yourself fortunate and stop here.
If, on the other hand, you see a FAILED status, non-zero reallocated sector counts, or a rising count of pending uncorrectable sectors, the drive is genuinely in trouble. Continue with the steps below.
Step 2: Identify your drives with GParted
GParted is a free, graphical partition editor for Linux. Beyond its partition management capabilities, it serves a critical role in the recovery workflow: it makes it immediately obvious which block device corresponds to which physical drive. This matters enormously because the destination drive will be completely overwritten during the imaging process. Confusing source and destination is an irreversible mistake.
Installing GParted
$ sudo apt update && sudo apt install gpartedLaunch it from your application menu or by pressing the Super key and typing GParted. Use the drop-down menu in the top-right corner to cycle through each detected block device. You can see the partition layout, filesystem types, and labels for each drive — making it straightforward to confirm which device is your source and which is your destination before you run anything destructive.
GParted 1.8.1 also handles NVMe drives (typically /dev/nvme0n1, /dev/nvme1n1, and so on) cleanly, which is increasingly relevant as NVMe SSDs become the default storage medium in modern laptops and desktops.

Step 3: Recover your data with GNU ddrescue
GNU ddrescue is a command-line data recovery utility that copies data from one file or block device to another while prioritising the retrieval of readable data. Unlike a simple dd copy, which stops or stalls on the first read error, ddrescue records which sectors are problematic in a mapfile and returns to retry them later. This approach maximises the data recovered from a degraded drive.
GNU ddrescue is a data recovery tool. It copies data from one file or block device (hard disc, cdrom, etc) to another, trying to rescue the good parts first in case of read errors.
Installing GNU ddrescue
$ sudo apt update && sudo apt install gddrescueNote that the Ubuntu repositories may carry a version slightly behind the upstream release. For most recovery tasks the packaged version is entirely adequate — do not be tempted to chase the latest upstream release unless you have a specific reason to do so.
Using ddrescue safely
GNU ddrescue is capable of permanently destroying data if used carelessly. Read this section before you run anything.
Let tools finish
Imaging a large drive can take many hours. Do not interrupt the process. Ensure your computer will not hibernate or sleep.
Never use mounted partitions
The source drive must not be mounted — not even read-only. Mounted partitions introduce write activity that can corrupt a failing drive further.
Copy first, repair later
Never attempt to repair a filesystem directly on a damaged drive. Image it first, then attempt any repairs on the copy.
The official GNU ddrescue manual is direct on this point:
- GNU ddrescue is like any other power tool. You need to understand what it does, and you need to understand some things about the machines it does those things to, in order to use it safely.
- Never try to rescue a r/w mounted partition. The resulting copy may be useless. It is best that the device or partition to be rescued is not mounted at all, not even read-only.
- Never try to repair a file system on a drive with I/O errors; you will probably lose even more data.
- If you use a device or a partition as destination, any data stored there will be overwritten.
- Some systems may change device names on reboot (e.g. udev-enabled systems). If you reboot, check the device names before restarting ddrescue.
- If you interrupt the rescue and then reboot, any partially copied partitions should be hidden before allowing them to be touched by any operating system that tries to mount and "fix" the partitions it sees.
Identifying your block devices before you start
Use lsblk to list all attached drives. The -e7 flag excludes RAM disks, keeping the output clean.
$ sudo lsblk -e7The output will look something like this:
NAME   MAJ:MIN RM   SIZE RO TYPE MOUNTPOINT
sda      8:0    0 931.5G  0 disk
├─sda1   8:1    0   512M  0 part /boot/efi
└─sda2   8:2    0   931G  0 part /
sdb      8:16   0 931.5G  0 disk
├─sdb1   8:17   0  1000M  0 part
├─sdb2   8:18   0   260M  0 part
├─sdb3   8:19   0  1000M  0 part
├─sdb4   8:20   0   128M  0 part
├─sdb5   8:21   0 891.7G  0 part
├─sdb6   8:22   0    25G  0 part
└─sdb7   8:23   0  12.5G  0 part
sdc      8:32   0 931.5G  0 disk
├─sdc1   8:33   0  1000M  0 part
├─sdc2   8:34   0   260M  0 part
├─sdc3   8:35   0  1000M  0 part
├─sdc4   8:36   0   128M  0 part
├─sdc5   8:37   0 891.7G  0 part
├─sdc6   8:38   0    25G  0 part
└─sdc7   8:39   0  12.5G  0 part
In this example, /dev/sda is the running Linux system (identifiable by the /boot/efi and / mount points), /dev/sdb is the suspected failing drive, and /dev/sdc is the blank destination drive. If you are unsure, unplug all external drives and run lsblk -e7 again, then reconnect them one at a time until you are certain of each device name.
If you are working with NVMe drives, device names will follow the pattern /dev/nvme0n1, /dev/nvme1n1, and so on. The same caution applies.
Running ddrescue from the command line
The basic syntax for imaging an entire drive is:
$ sudo ddrescue -d -r3 /dev/sdb /dev/sdc /root/recovery.mapBreaking this down:
-d— use direct disc access, bypassing the kernel cache for more reliable reads from a failing drive.-r3— retry failed blocks up to three times before giving up on them./dev/sdc— the destination (new, blank) drive./root/recovery.map— the mapfile. This records which sectors have been successfully copied and which have not, allowing you to safely interrupt and resume the operation if needed.
/dev/sdb — the source (failing) drive.
If you need to image to a file rather than a second drive (for example, to an external USB drive with enough free space), replace the destination device with a file path:
$ sudo ddrescue -d -r3 /dev/sdb /mnt/external/recovery.img /mnt/external/recovery.mapA 1 TB drive with no errors will typically complete in around six to eight hours. A heavily damaged drive can take considerably longer. Leave the process running, ensure your machine will not sleep, and do not interrupt it.
DDRescue-GUI: a graphical option
For those who prefer not to work at the command line, DDRescue-GUI provides a graphical front-end for GNU ddrescue. Version 2.2.0 is the current release and has been downloaded over 156,000 times across Linux, Windows, and macOS.
On Ubuntu, the recommended installation method is via the author's PPA:
$ sudo add-apt-repository ppa:hamishmb/myppa
$ sudo apt update
$ sudo apt install getdevinfo ddrescue-gui
Note that getdevinfo must be installed before DDRescue-GUI. The application requires elevated permissions because it reads from and writes to block devices directly. Launch it with sudo ddrescue-gui or via your application menu — it will prompt for your password.
Alternatively, a paid download is available directly from the author's website at hamishmb.com, which includes a business edition with priority email support.
An example recovery with DDRescue-GUI
The following screenshots illustrate a real-world recovery: imaging a 1 TB Windows drive removed from a Lenovo laptop and connected via a USB-to-SATA adapter, with a second identical-capacity drive as the destination.
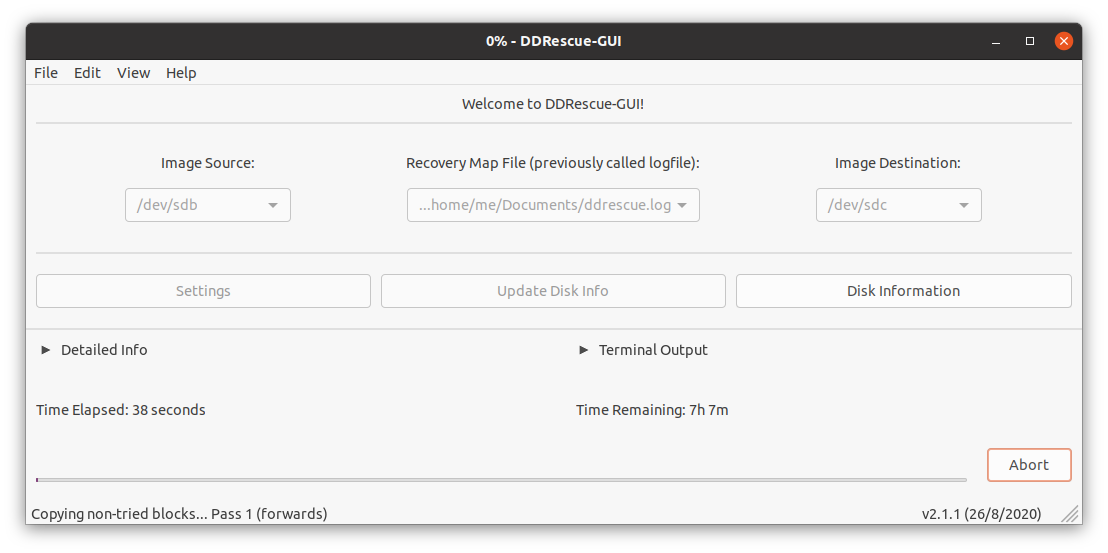
Select your image source, image destination, and a location for the recovery map file. The map file is important — it lets you resume an interrupted recovery without starting from scratch.

The Detailed Info panel shows real-time progress, error counts, and read rates as the operation runs.

The Terminal Output tab exposes the raw ddrescue output for those who want to see exactly what is happening under the hood.

A confirmation dialogue appears when the operation finishes. Once complete, you can mount the destination drive and inspect its contents.

Conclusion
In 2026, GNU ddrescue remains the most reliable open-source tool for imaging a failing drive on Linux. The workflow is straightforward once you understand it: check the drive's health with smartctl, confirm your device names with GParted, and let ddrescue do its work with a mapfile so you can safely resume if anything interrupts the process. If the drive turns out to be healthy, you may never need ddrescue at all — mount it, copy your files, and move on.
For users who prefer a graphical interface, DDRescue-GUI 2.2.0 wraps the same underlying tool in a clear, approachable interface and is available on Ubuntu via PPA. The command-line approach remains more flexible and is worth learning, but the GUI removes most of the opportunities for a costly mistake.
Whatever situation brought you here — a failing hard drive, a suspected ransomware incident, or simple peace of mind — the combination of smartmontools, GParted, and GNU ddrescue gives you a robust, well-maintained toolkit for getting your data back. Be patient, be methodical, and don't interrupt the process once it's running.