
Dramatically improve your Joomla site security using SSH keys in 2026
Secure Shell Protocol (SSH) remains the gold standard for securing remote connections to your server — and in 2026, with automated credential-stuffing attacks and AI-assisted brute-force tools more prevalent than ever, getting SSH key authentication right is no longer optional. It sounds complex, but the payoff is enormous: once set up, key-based SSH is more secure, more convenient, and far more resilient than any password you could choose.
Passwords are bad, keys are good
Passwordless secure connectivity between your local machine and your Joomla CMS is one of the highest-value security improvements you can make. No password means nothing to brute-force, nothing to phish, and nothing to leak in a data breach. The only machine that can connect is the one holding the correct private key. This article walks you through exactly what you need to know — no more, no less.
What you'll find out
- Just enough about SSH to make your command-line access genuinely secure
- Why Joomla CMS terminal access demands SSH key authentication in 2026
- How to generate an Ed25519 key pair (the current recommended algorithm) and deploy it
- How to add your key to your hosting control panel and test the connection
- Using the Joomla CLI to manage your site from the command line
- A recap of the real-world benefits of key-based authentication
TL:DR – The setup takes under fifteen minutes and you never have to think about password-based SSH again. Automated attack tools scan the entire internet continuously; key-based SSH stops them cold.
Contents
- Dramatically improve your Joomla site security using SSH keys in 2026
- Passwords are bad, keys are good
- What you'll find out
- Using keys with Secure Shell Protocol (SSH) to dramatically improve your Joomla CMS security
- Just enough about SSH to make your command-line access secure
- Joomla CMS access via the terminal and why it needs SSH
- What can happen if you don't secure your Joomla site?
- Hands-on: implement SSH keys for passwordless Joomla access
- Enabling SSH in your hosting portal
- Generating your Ed25519 key pair
- Adding the public key to your hosting control panel
- Testing the connection and using the Joomla CLI
- Recap: the real benefits of key-based SSH authentication
Using keys with Secure Shell Protocol (SSH) to dramatically improve your Joomla CMS security
- Understanding just enough about SSH
- Why Joomla terminal access needs SSH keys
- Implement SSH keys for passwordless access
- Use the Joomla CLI to get stuff done
- Recap of the benefits
Just enough about SSH to make your command-line access secure
At its core, SSH is a cryptographic network protocol that creates a secure, encrypted channel between two machines. Everything passing through that channel — commands, file transfers, responses — is encrypted in transit and protected from interception or tampering. That alone is a significant improvement over older protocols like Telnet or unencrypted FTP, but SSH's real power comes from its authentication model.
Rather than relying on a password, SSH can authenticate using a key pair: a public key and a private key. The public key lives on the server. The private key stays on your local machine and never leaves it. When you connect, the server issues a cryptographic challenge that only the holder of the matching private key can answer correctly. No password is transmitted, no password is stored on the server, and no password can be guessed or stolen.
For years, the RSA algorithm at 4096 bits was the standard recommendation for generating SSH keys. In 2026, the current best practice has shifted to Ed25519, an elliptic-curve algorithm that produces shorter keys, connects faster, and is considered more robust against future cryptanalytic advances. You will still encounter RSA keys in the wild — they remain secure at 4096 bits — but Ed25519 is what you should generate today.

SSH is the right tool for any connection where you are transferring data or issuing commands to a remote server. In a content management system like Joomla, this matters acutely: your server may hold user personal data, payment records, or confidential business content. An unencrypted or password-authenticated connection is a liability you do not need to carry.
One important shift worth noting for 2026: OpenSSH, which ships with macOS, most Linux distributions, and Windows 11, now defaults to disabling older, weaker algorithms including DSA keys and some legacy cipher suites. If you are working with an older key or an older server configuration, you may encounter connection refusals that were not there before. The fix is simply to generate a modern key — which is exactly what this article covers.
Joomla CMS access via the terminal and why it needs SSH
Terminal access to your server is powerful and therefore dangerous. From the command line you can read files, modify configurations, run scripts, and — if things go wrong — cause serious damage. You should never make that access easy to reach without strong authentication in place.
Joomla 5, the current major release series, ships with a capable command-line interface that lets you check for updates, run maintenance tasks, manage extensions, and interact with the Joomla API without touching the browser-based administrator. That CLI is genuinely useful — but it only makes sense to use it if your SSH connection is properly secured. Key-based authentication is the prerequisite.
Before you go near the command line, make sure your broader Joomla security posture is solid. Keep Joomla and all extensions updated — the Joomla Security Strike Team publishes advisories regularly and known vulnerabilities are targeted quickly once they are public. Deploy a correctly configured .htaccess file. Use an administrator account with a name that is not admin or administrator. Enforce multi-factor authentication on your administrator account using a hardware key such as a YubiKey 5 series or a TOTP authenticator app such as Google Authenticator or Aegis on Android. If those protections are not in place, SSH key access to the CLI is the least of your worries.
What can happen if you don't secure your Joomla site?
To make the stakes concrete, here is what inadequate security actually leads to:
- Without anti-spam measures on contact forms — reCAPTCHA v3, hCaptcha, or Joomla's built-in CAPTCHA integration — your site can become a spam relay.
- Unpatched extensions are the most common attack vector against Joomla sites. A known vulnerability left unpatched is an open invitation.
- A misconfigured
.htaccessfile can leave directories world-writable, allowing attackers to upload and execute malicious scripts. - Password-only administrator accounts are continuously targeted by credential-stuffing attacks that use leaked password databases. These attacks are fully automated and run at scale.
- Successful attacks range from site defacement — the least harmful outcome — to full data exfiltration, malware installation, and your site being used as part of a botnet or phishing infrastructure.
None of this is hypothetical. Automated scanners probe every public-facing Joomla installation continuously. The question is not whether your site will be targeted, but whether it will hold.
Hands-on: implement SSH keys for passwordless Joomla access
Here are the steps from start to finish:
- Enable SSH in your hosting portal
- Generate your Ed25519 key pair
- Add the public key to cPanel
- Test the connection and use the Joomla CLI
Enabling SSH in your hosting portal
Not every shared hosting provider allows SSH access, so confirm yours does before proceeding. Most reputable managed Joomla hosts — including Rochen, SiteGround, and Cloudways — provide SSH access as standard on their mid-tier plans and above. Log in to your hosting portal and look for an SSH access toggle. Enable it. The setting is typically found in the main account management area, separate from cPanel itself. Once enabled, you can connect using a username and password initially — but the goal is to replace that password login with key-based authentication immediately.
Generating your Ed25519 key pair
On macOS (Sequoia or later), Linux, or Windows 11 with the built-in OpenSSH client, open a terminal and run the following. Ed25519 keys do not require a bit-length parameter:
- First, check whether you already have an SSH key in
~/.ssh/. If you do, choose a distinct filename for this new key so you do not overwrite anything. - Open a terminal and run:
% ssh-keygen -t ed25519 -C "yoursite-2026"
Generating public/private ed25519 key pair.
Enter file in which to save the key (/Users/username/.ssh/id_ed25519): id_ed25519_yoursitename
Enter passphrase (empty for no passphrase):
Enter same passphrase again:
Your identification has been saved in id_ed25519_yoursitename
Your public key has been saved in id_ed25519_yoursitename.pub
The key fingerprint is:
SHA256:abc123xyz456def789ghi012jkl345mno678pqr901stu yoursite-2026
The key's randomart image is:
+--[ED25519 256]--+
|        .o+.     |
|       . =o+     |
|      . + B.o    |
|       o X =.    |
|      . S B .    |
|       o + o     |
|        . + .    |
|         . + .   |
|          .=E    |
+----[SHA256]-----+
- The
-Cflag adds a comment to the key — useful for identifying it later. Use something descriptive. - When prompted for a passphrase, you can leave it empty for fully passwordless operation. If your machine is shared or you want an extra layer of protection, a passphrase combined with
ssh-agentgives you both security and convenience — you enter the passphrase once per session and the agent handles authentication automatically after that. - The result is two files in
~/.ssh/:id_ed25519_yoursitename(private — never share this) andid_ed25519_yoursitename.pub(public — this goes on the server).
Adding the public key to your hosting control panel
This step puts your public key on the server so it can verify your identity when you connect. The process below uses cPanel, which remains the most widely deployed control panel on shared and managed hosting in 2026.
- In cPanel, find SSH Access — it is usually in the Security section.

SSH Access in cPanel — location varies slightly by host theme - Click Manage SSH Keys, then Import Key. You are importing the key you just generated locally rather than generating a new one on the server.
- Give the key a recognisable name — for example
id_ed25519_yoursitename.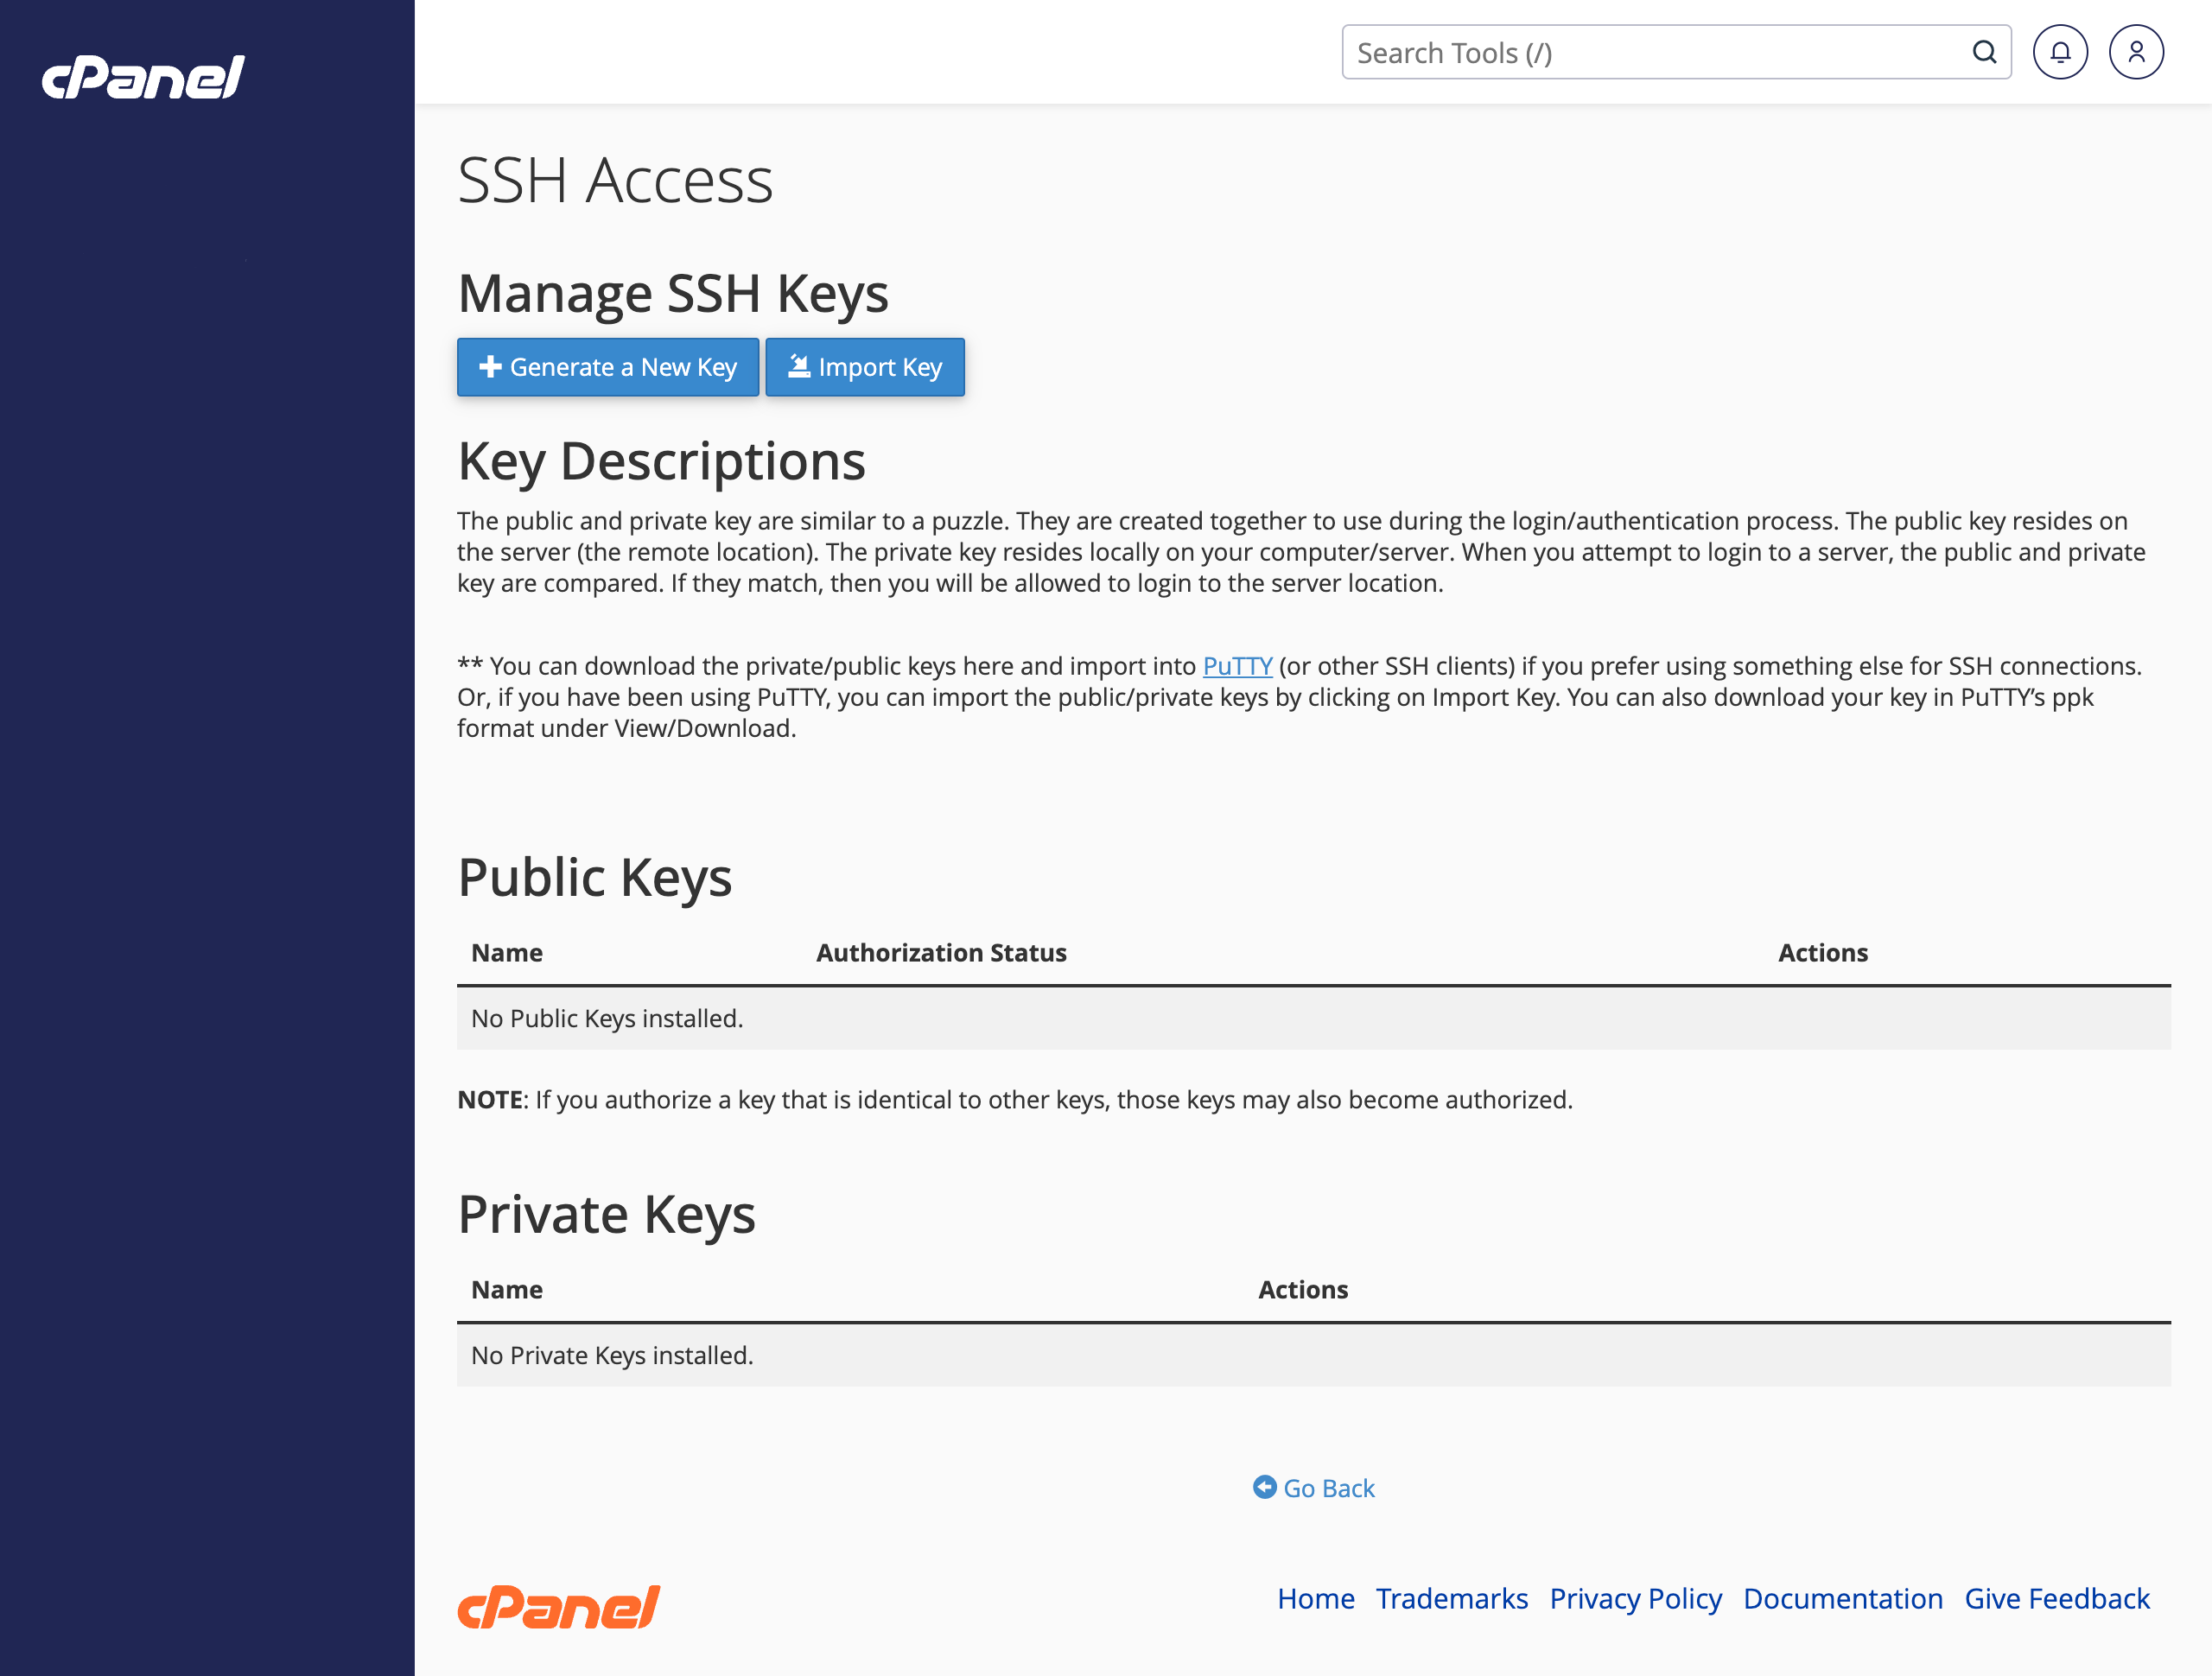
Managing SSH keys in cPanel - Copy the contents of your public key file into the public key field. On macOS you can pipe it straight to the clipboard:
cat ~/.ssh/id_ed25519_yoursitename.pub | pbcopy
On Linux use xclip or wl-copy depending on your display server. On Windows use Get-Content ~/.ssh/id_ed25519_yoursitename.pub | Set-Clipboard in PowerShell. Then paste with ⌘V (macOS) or Ctrl+V. Paste only the public key — the form may have a field for the private key too, which you should leave blank.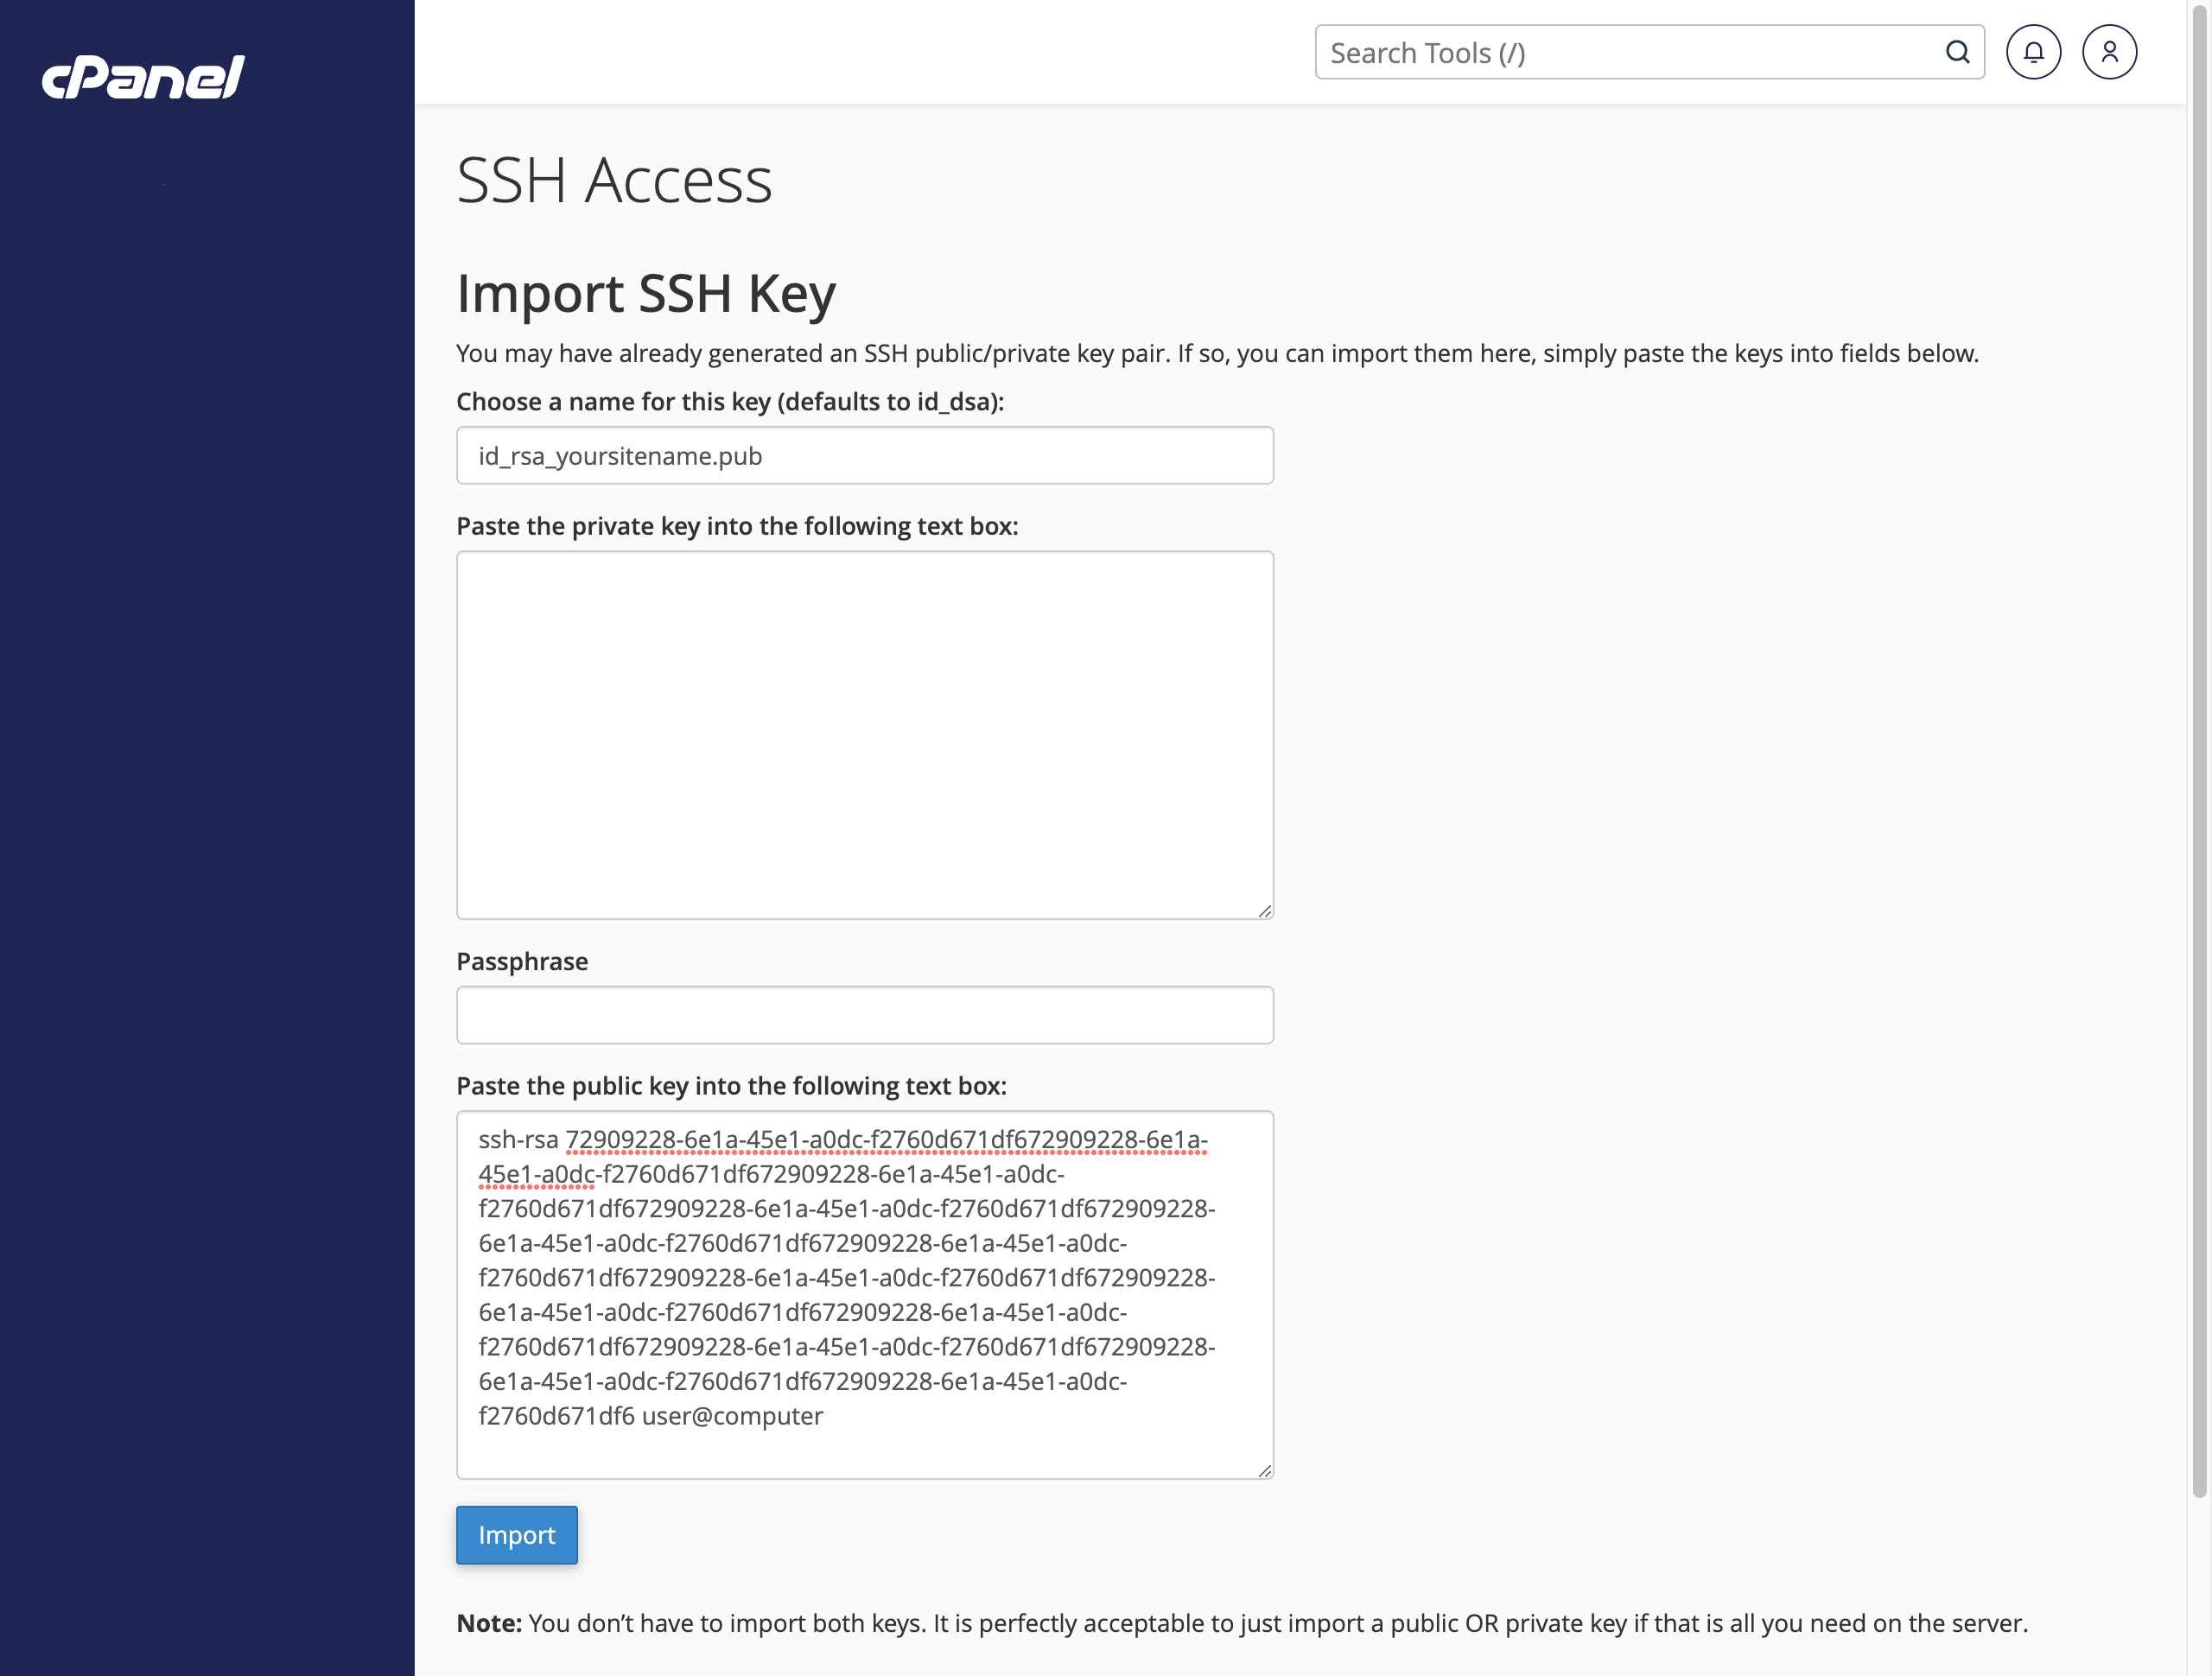
Importing the SSH public key to cPanel - You should see a success confirmation.

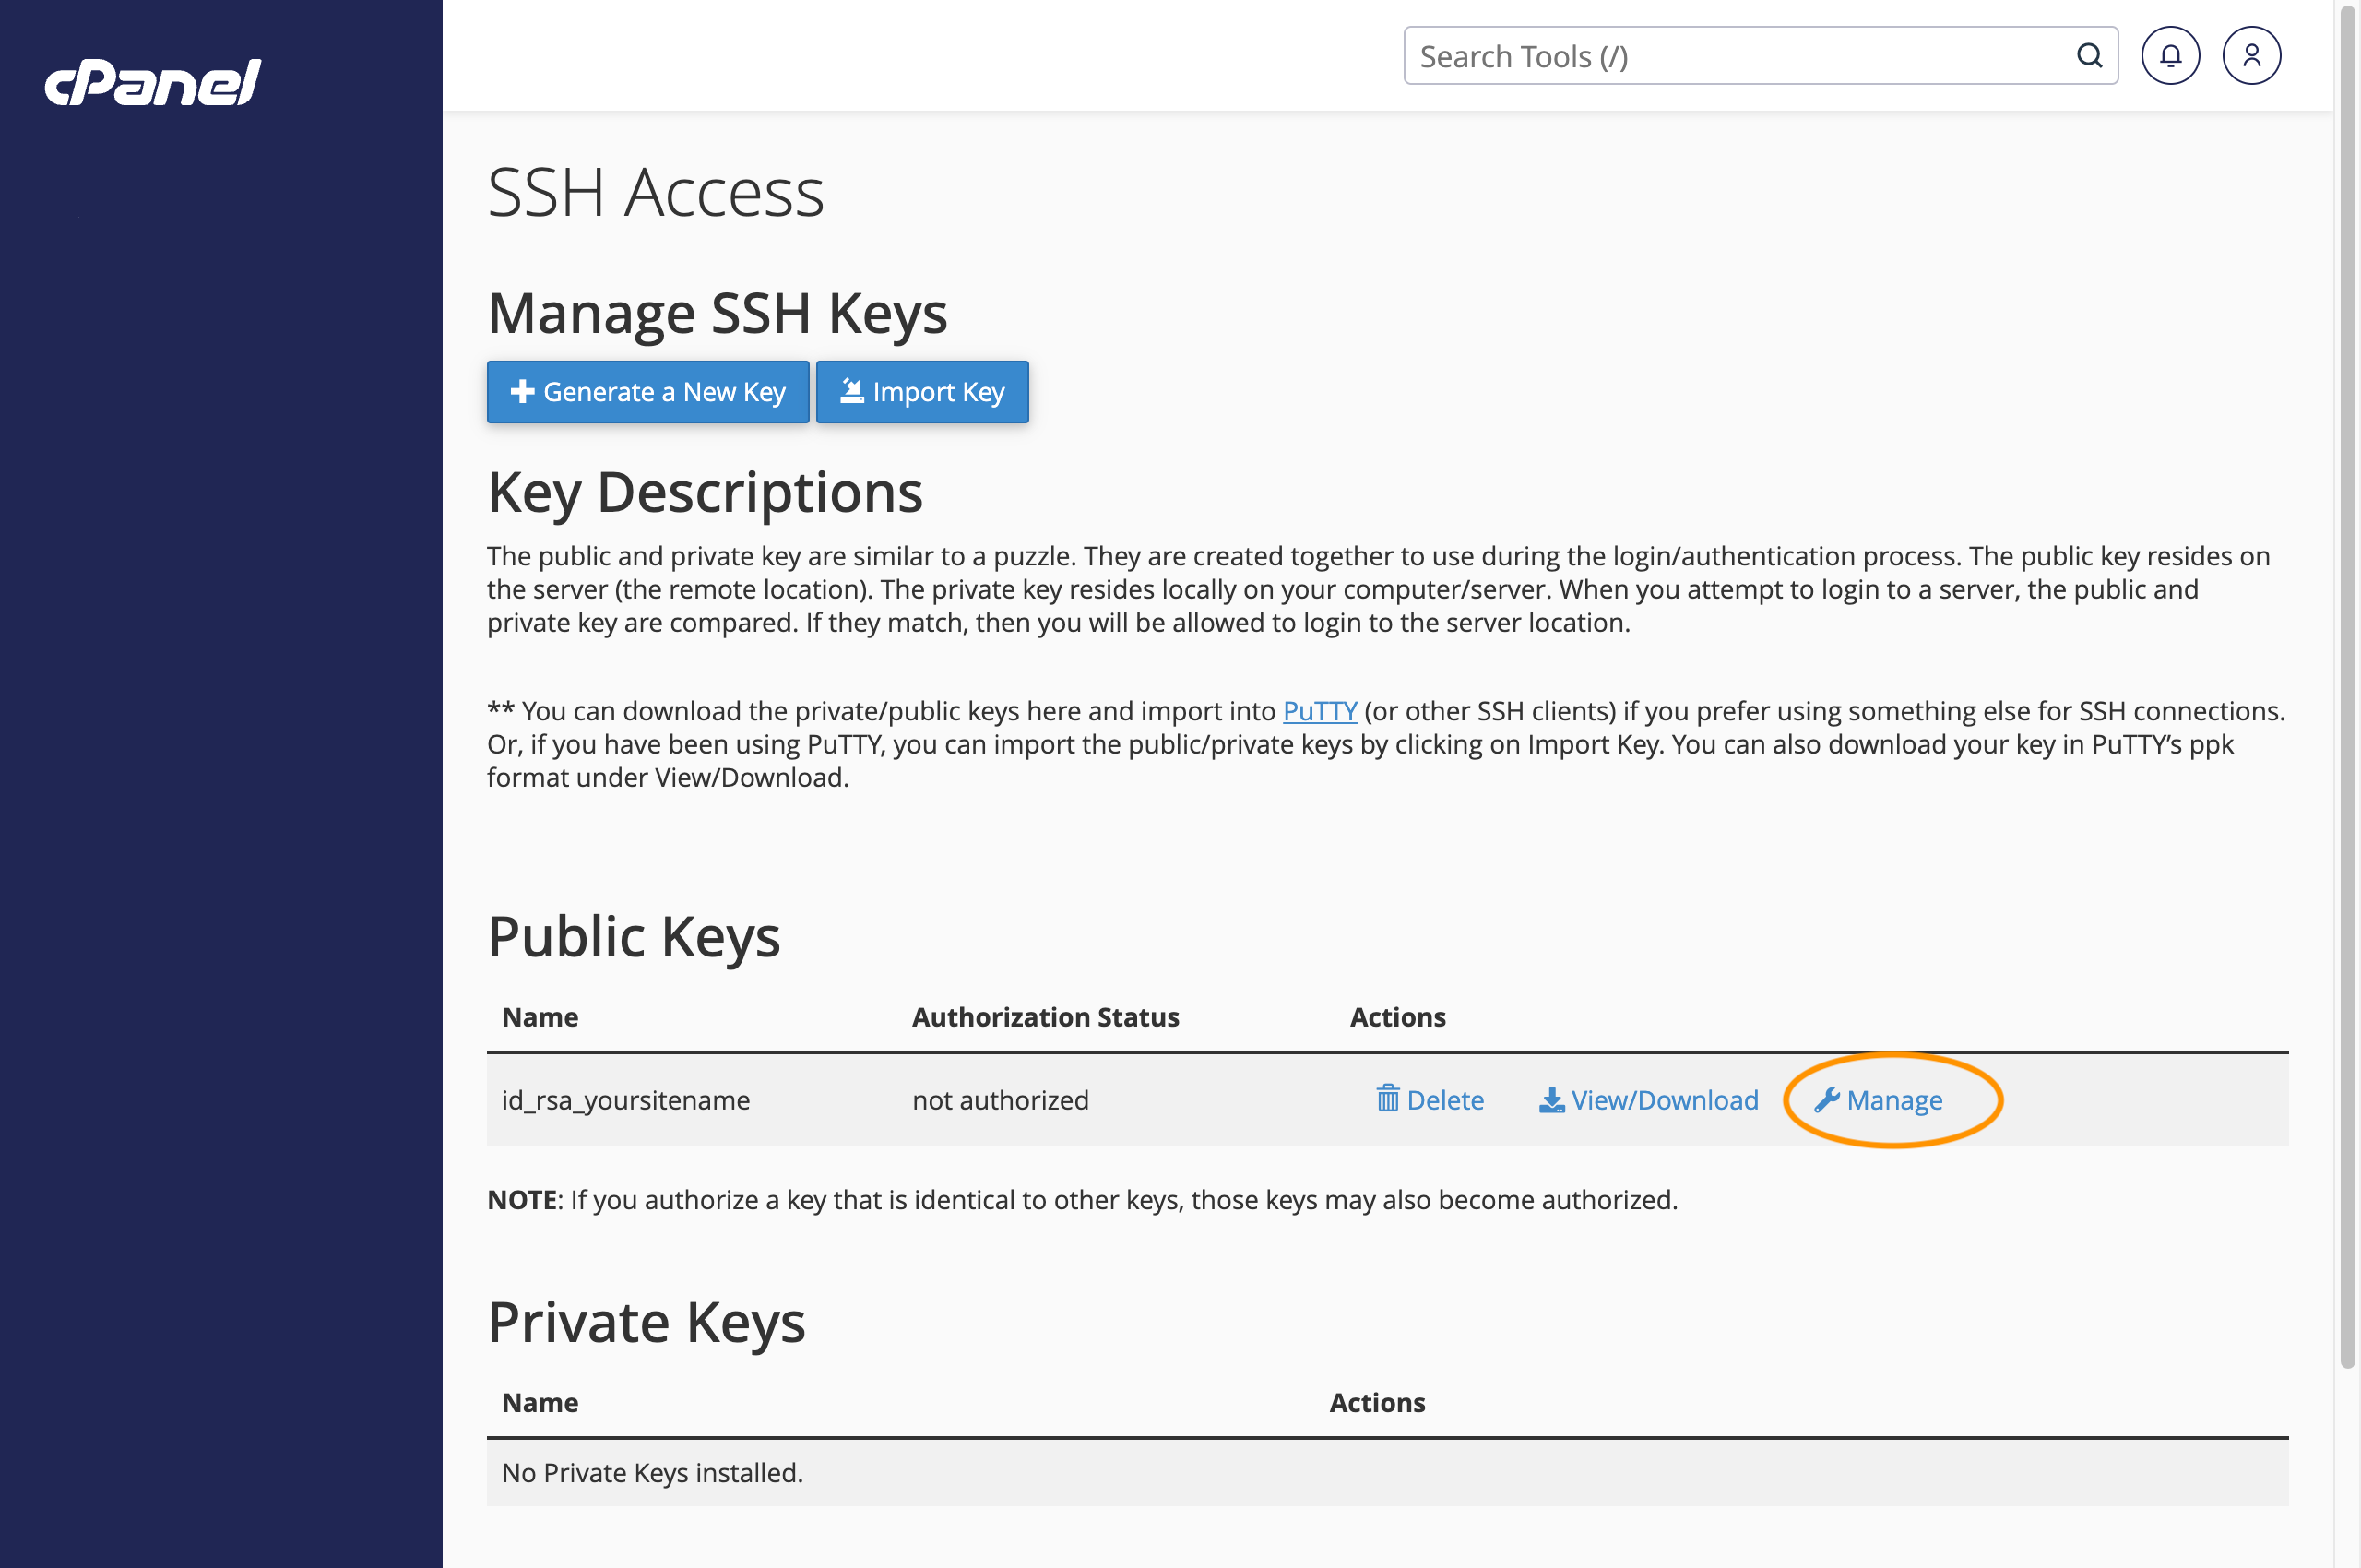
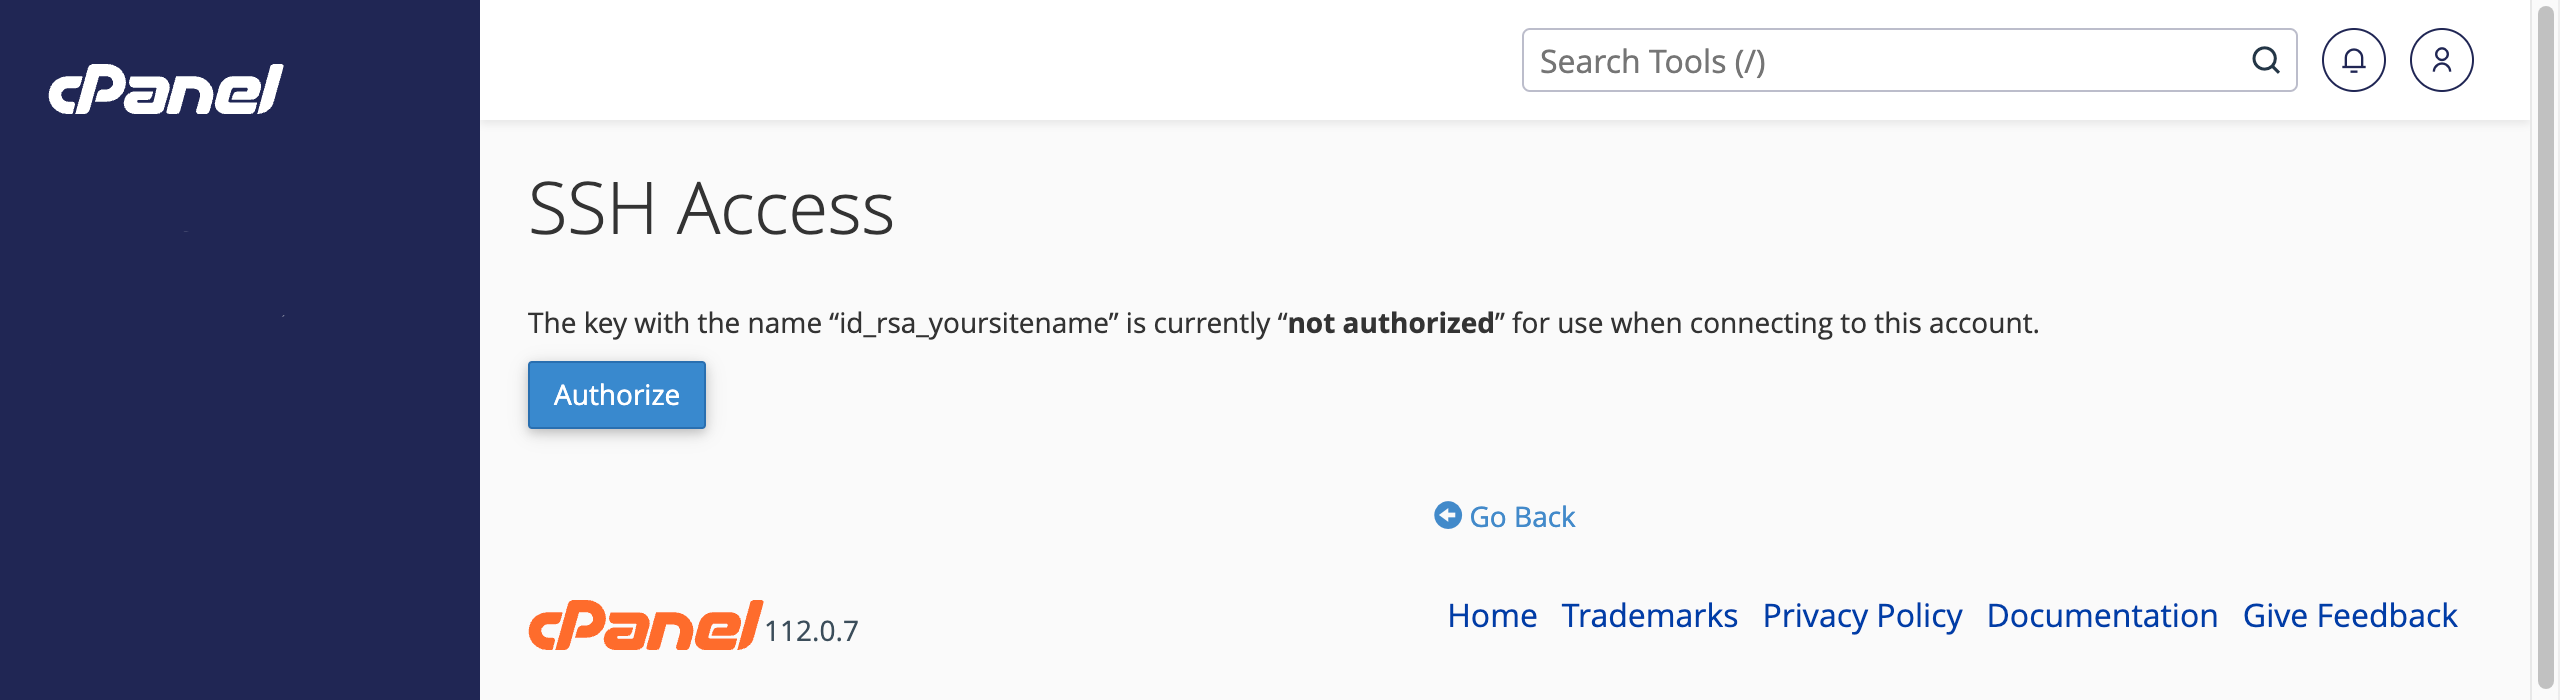
cPanel confirms the key has been imported - Return to Manage SSH Keys and click Manage next to your new key to authorise it.
Authorising the key for use - Click Authorise.
Finalising authorisation - One final success confirmation and you are done on the server side.

Your SSH key is authorised and ready to use
If your host uses a different control panel — Plesk, DirectAdmin, or a proprietary dashboard — the process is conceptually identical: find the SSH keys section, import your public key, and authorise it. The labels differ but the steps do not.
Testing the connection and using the Joomla CLI
- Connect using the
-iflag to specify your private key file and the hostname of your server. A successful connection drops you straight into a shell prompt with no password prompt at all.% ssh -i ~/.ssh/id_ed25519_yoursitename yoursite [username@host ~]$ - If you get a connection refused or a permission denied error, double-check that the key name matches exactly and that you authorised the key in cPanel. SSH is case-sensitive and whitespace-sensitive throughout.
- Once connected, navigate to the Joomla CLI directory and run a check. Joomla 5 ships with an expanded CLI that covers updates, cache management, extension operations, and more:
[username@host ~]$ cd public_html/cli [username@host cli]$ php joomla.php core:check-updates Joomla! Updates =============== [OK] You already have the latest Joomla version 5.x.x [username@host cli]$ - You can also list all available CLI commands to see what else is at your disposal:
[username@host cli]$ php joomla.php list
To make repeated connections more convenient, add an entry to your local ~/.ssh/config file:
Host yoursite
    HostName yoursite.com
    User yourusername
    IdentityFile ~/.ssh/id_ed25519_yoursitename
    IdentitiesOnly yes
With that in place, you connect with simply ssh yoursite — no flags required. The IdentitiesOnly yes directive tells OpenSSH to use only the specified key and not to offer others, which avoids authentication failures on servers that lock accounts after too many failed attempts.
Recap: the real benefits of key-based SSH authentication
- There is no password to brute-force, phish, guess, or leak in a third-party data breach.
- The encrypted tunnel means your commands and data cannot be intercepted in transit, even on an untrusted network.
- Once configured, it is genuinely more convenient than typing a password — connection is instant.
- Ed25519 keys are compact and fast, with no meaningful performance overhead.
- You can revoke access for a specific machine immediately by removing its public key from the server — no password reset required, no shared credential to rotate everywhere.
- Key-based authentication is a prerequisite for secure automation: deployment scripts, cron-triggered CLI tasks, and CI/CD pipelines all benefit from not needing a stored password.