It is well worth taking the time to set out the entire platform for your Flutter based project with FlutterFlow before you start. The least expensive way to make an error about the structure or the naming in your project is on paper before you start. You'll thank me later.
Think about all the pieces of the FlutterFlow puzzle
You'll need a FlutterFlow Subscription or trial and to work through the Getting Started turorial of course, but there are also other tools you may need. I would recommend setting out a System Map/ diagram of your whole platform from FlutterFlow and other development tools to target platforms and devices. This is a good time to think about your project naming, and how to keep product marketing naming out of your platform naming too. Once you've done that, you're ready to get into FlutterFlow app building. Start with FlutterFlow Settings including FlutterFlow Theme Settings, and then try out an integration of Google AdMob with FlutterFlow, and an integration of Google Maps with FlutterFlow. Once you have a working app, you can think about adding GitHub integration to FlutterFlow, so that you can control the actual Flutter source code that Flutter generates. This s part of the power of FlutterFlow. It is not a no-code environment. It is an augmentation to professional development workflow.
TL:DR — FlutterFlow is far ahead of any competition and integrates with professional development and devops environments well. Having published hundreds of apps over the years, and lately having published my first app entirely built with FlutterFlow I can say it is viable for production of proper mobile apps of any scale, from minimum viable product, through to sophisticated apps of production quality. But you still need to think about the details of your project and the best way to do that is to document your work, if only for future you.
Contents
- Think about all the pieces of the FlutterFlow puzzle
- Why am I doing this in FlutterFlow?
- FlutterFlow, free plans, subscriptions, and environment
- Pro, Standard or Free Plan?
- Getting started with a FlutterFlow project
- Downloading your source code and running it locally with Flutter development tools
- Keep product marketing naming out of your project naming
- Create a system map of the main structures in the FlutterFlow project
- Build a custom colour scheme or implement a branded theme, easily
- FlutterFlow Settings
- App Settings - Theme
- Light and Dark mode/appearance
- Fonts
- NavBar and AppBar Theme
- App Assets
- App Details
- Project Setup
- Languages Details
- Target platform details
- Google AdMob integration settings
- FlutterFlow AdMob Integration
- Google Maps in FlutterFlow
- Adding Google Maps to the app
- Signing up for Google Maps
- Push your project FlutterFlow source code to GitHub
- GitHub integration settings
- Setting upFlutterFlow GitHub integration
- Create the app pages using FlutterFlow
- Home page
- Map page
- Build your Flutter based app
- Prepare your app to run locally
- Run it on an emulator or real device
- Sign-in page
- Home page
Why am I doing this in FlutterFlow?
I have an app from about ten years ago. It is the app that was my first successful app using a cross platform application development framework for IOS and Android with data stored in the cloud. The framework and the app are no more but as as a kind of anniversary I wonder if it could be re-implemented entirely using FlutterFlow and published again with an ad-supported revenue model rather than a B to B sales model.
My app used google maps, and a public data API, and stored user settings in the cloud. It was not a trivial app, even back then with early Android and iOS releases it had some beautiful engaging functionality. So I think it will be a great test of the capabilities of FlutterFlow to re-imagine it for today's devices.
In order to get started I set about trying out all the features in FlutterFlow so as to see what would be the best implementation approach for my new app. I built an app with a view to just trying things out.
There is a lot to take in and understand in FlutterFlow and it helps for me to try out functionality on a small scale before implenentation in production apps.
FlutterFlow, free plans, subscriptions, and environment

Pro, Standard or Free Plan?
FlutterFlow 'Pro' is needed to integrate with Github and deploy easily to the App Store and Google Play. It includes the features in the previous tiers.
Once subscribed, the business of setting up a new app is simple. Far more simple than using a traditional and complicated development toolchain with a development workstation. You are still going to need a Flutter based development environment though, FlutterFlow takes the pain out of assembling the design and debugging online, but can't replace all local build and debugging tools with directly connected real devices. FlutterFlow works best on Chrome, and lately theres a macOS FlutterFlow designer app. I'm using a Mac, and you need a Mac anyway if you want to use the Xcode tools including the iOS Simulator. This isn't a failure of FlutterFlow by the way. FlutterFlow is a brilliant augmentation of the design process for Flutter based apps, but you still need to debug your apps on real devices and manage your own code as part of your devops process.
Getting started with a FlutterFlow project
To get started, launch FlutterFlow, and create a new app project. Just click 'Create Project' to do that use your chosen codename and launch Flutterlow's app designer …

Click through the reassuring welcome message to get started. You can choose an existing template or a blank app.

FlutterFlow has a comprehensive set of Youtube videos available to guide you through the steps of app building.

You can change the device resolution to best fit your display and choose from a variety of device sizes from real world devices.
Downloading your source code and running it locally with Flutter development tools
This is a good way of working with FlutterFlow and I would recommend installing the Flutter SDK, and an editor such as Sublime Text for Mac or Linux or BBEdit for Mac. You should also really take the time to set up a local integrated development environment (IDE) such as VSCodium or Android Studio on a Mac, or Android Studio for ChromeOS. If you want to build locally and test on iOS you must use a Mac. Xcode along with other dependencies are required for building iOS apps so you will need to download those too. The iOS simulator only runs on a Mac. FlutterFlow downloaded code works perfectly with all these local Flutter development tools.
Keep product marketing naming out of your project naming
Pro Tip: I codenamed this app project YellowGreen. I always name my projects the name of a colour. I always use codenames because they make it easier to manage projects like this comprising multiple services to create a cloud and mobile platform. If you are tempted to use the Product name remember that product names are subject to change as are App names in the App Store and Google Play. I never use the marketing name in case it changes. You won't believe how many times I have encountered code names which have been product names that changed and then are too hard to change everywhere else. Leaving remnants of old product names in your platform condemns you to a world of pain. I'd always recommend using a codename across all the aspects of the project so as to keep consistent names for all the services, and because you can talk over details of projects or even allocate work to third parties using codenames without giving away client confidentiality. You don't need to add the marketing name for the App till you are ready to launch. Stay abstracted from the product marketing name. You'll thank me, I promise.
Create a system map of the main structures in the FlutterFlow project
The preparation work in thinking out and drawing a system diagram for the platform has a direct impact on the whole project, so I am going to spend a little time setting out all the project components required. The simplicity of FlutterFlow does not excuse the need to be careful about your overall system design and consistent about the implementation. I find it helpful to write these things down with a diagram or kind of map of the components in the overall project. Heres what it looks like as I start the project. It will probably change before I am finished.
  ┌──────────────────────┐ ┌───────────────────────┐
  │FlutterFlow Project   │ │GitHub Repository      │
  │                      │ │                       │
  │YellowGreen           │ │YellowGreen            │
  └──────────────────────┘ └───────────────────────┘
  ┌──────────────────────┐ ┌───────────────────────┐
  │ Firebase Project     │ │AdMob Account          │
  │                      │ │                       │
  │ YellowGreen          │ │your email for admob   │
  ├──────────────────────┤ ├───────────────────────┤
  │ Firebase apps        │ │AdMob apps             │
  │                      │ │                       │
  │ iOS - YellowGreen    │ │iOS - YellowGreen      │
  │ Android - YellowGreen│ │Android - YellowGreen  │
  │ Web - YellowGreen    │ │Ad unit - Banner (both)│
  └──────────────────────┘ └───────────────────────┘
  ┌────────────────────────────────────────────────┐
  │ Google Cloud Platform - Project YellowGreen    │
  │                                                │
  │ Google Maps Platform                           │
  │                                                │
  │ Enabled API's                                  │
  │                                                │
  │ Maps SDK for Web                               │
  │ Maps SDK for iOS                               │
  │ Maps SDK for Android                           │
  └────────────────────────────────────────────────┘
It really is worth documenting all this from the get-go. There are a lot of moving parts from different providers and changing the project names later is painful and best avoided. I've omitted Flutter and Dart here, but they are the underpinning of FlutterFlow.
Build a custom colour scheme or implement a branded theme, easily

FlutterFlow cannot import the Flutter code generated by Material theme builder but it is easy to pick the colours and place the hex codes for them in your FlutterFlow theme.
FlutterFlow Settings
As tempting as it is to jump right in, there is quite a bit of setup to be done. Click the Settings Cog - at the bottom of the screen and work through the services you are going to need for your app. (These screens may change slightly but the details remain the same).
- Project and Package Names — Make sure you set the Project Name and Package name as you want them. You probably dont want the default Package Name but should use reverse domain notation with your codename. I called my Project
YellowGreenand my Package Name in reverse domain name notation isuk.co.multizone.yellowgreen. Using codenames here to represent the app in the packagename means that they won't ever be out of date because of a name change. - Flutter Theme — Here you can add assets for your app in the form of theme colour and font information, launcher and splash screen images and activity indicator type. I set the standard colours and added some further colours for the theme for my app.
- Github — I prefer private Git repositories away from Github, but this is a great integration and allows me to push my source code at any time to my private repository in GitHub. This is simple to set up, and again took less than five minutes to do. Once set up properly a big github ' Push to Repository' button appears here in Settings on the Github tab. Again this is much easier than SSH keys and the terminal command line.
- Google Maps — FlutterFlow needs the API keys for your Google Maps account. You can follow the tutorial, which enables iOS, Web and Android Maps API's for your Google project associated with this FlutterFlow app. You should take the time to restrict the key, and certainly come back and check the restrictions you set before deploying an app to production.
- Google AdMob — Since this is my app now, Im going to add advertising to it. AdMob has been around for years and is a proven solution. Follow the FlutterFlow AdMob Tutorial to set up the AdBanner widget. You can easily add a test ad to your app. It took more than 10 minutes, but that included setting up an AdMob account and documenting it in this article.
- Google Firebase — We will use Firebase in this project. You'll need a google developer account and to set up a project for this FlutterFlow app. Use the codename you created for FlutterFlow. It really only takes about 5 minutes to set this up. The detail is in Authentication, sign-in and real time data in FlutterFlow via cloud firestore . We will come back to it later. It is a lot easier to set up using FlutterFlow than it is to follow a Google codelab on Firebase integration.
App Settings - Theme

FlutterFlow has extensive and simple to use theme support. It supports light and dark mode/appearance. You can import colour palettes from 'Coolors' (although I found this to be not that useful so YMMV). You can choose a pre-set theme, or create your own. I found using the Material Theme builder to be the easiest way to create a theme for a FlutterFlow based Flutter app.
You can also control the default transition, and the loading indicator used in your app here too. Lastly you can upload custom icons for your app here. For this one page first app just select a theme, and Typography style.
Light and Dark mode/appearance
If you don't want to use Material theme builder, then FlutterFlow has some themes you can use out of the box. To choose one go to the Explore Themes button where you can see a preview before making a choice. It is important to set up your theme early on in your project work and only using named theme colours in your app. That way you can change them across the whole app from here should you need to change any colours.
Fonts
You can set your font styles up here too, before you go on and build any app components. If necessary for your project you can use a custom font family for your application.
NavBar and AppBar Theme

This is a demo app, so it doesnt have a Nav Bar. It has a simple App Bar, which has been styled.
App Assets

This app doesn't have app assets, but usually your apps will and you can upload them here. Thus completely avoiding painful pubspec.yaml spacing issues for the assets section.
App Details

In app details you need to set up your package name. Notice that it is my company domain name in reverse, with the codename at the end. You can also set the initial (unregistered user) page, and the logged in (registered user returning) start pages for the app. Thats nice. Users who have logged in stay logged in unless you implement a way for them to log out.
Project Setup

My team is only me! If you wanted to invite people to your project you can do this here.
Languages Details

This demo project only has one language so none of this is set.
Target platform details
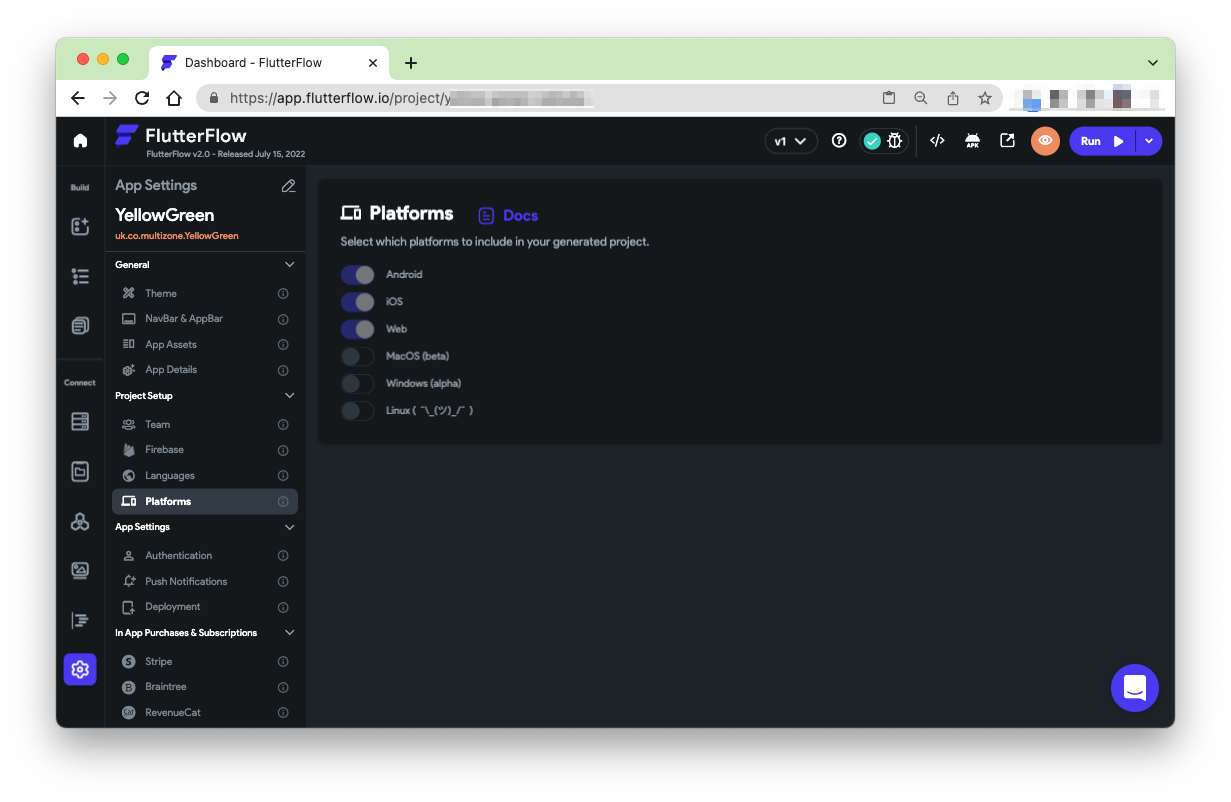
This is a mobile app, so it really only targets iOS and Android. Web is here just for running in FlutterFlow which is not the same as running on a real device but can be useful anyway for quick changes.
Google AdMob integration settings
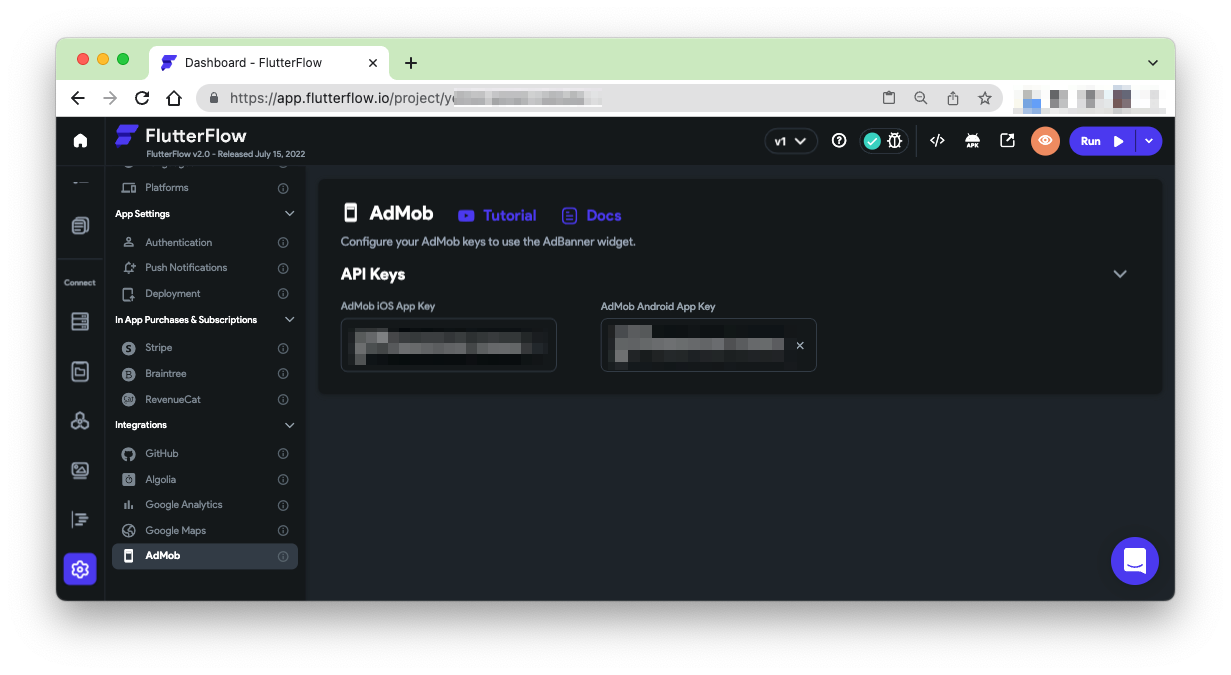
You'll need to get AdMob API keys and paste them in here so as to be able to use Google Maps in your app. The keys are separate for iOS and Android. AdMob is not for the Web.
FlutterFlow AdMob Integration
To make banner ad units work requires signing up for AdMob. This looks complicated but it is quite straightforward and once again really benefits from sensible consistent project naming.
- Open a new browser tab or window to — admob.com
- Sign up or sign in — For a Flutter app you will need to create two 'Admob apps' one each for your iOS and for your Android app.
- iOS — First, Select iOS, and say no to the app being on the App Store because it isn't published yet. You'll need to give the app a name. I'll use the codename
YellowGreen. - Create a banner Ad Unit — AdMob will direct you to create an Ad Unit. Create a Banner - this is the type currently supported by FlutterFlow. You'll need to name it something relevant like 'Banner'. Save and you will see a message that the Ad unit is successfully created. Copy the key beside the Apple Logo which is the AdMob iOS App ID and paste it in the AdMob Settings for iOS in the field 'AdMob iOS App Key'. You can find the key again in the AdMob website.
- Android — Now, Select Android, and say no to the app being on the Play Store because it isn't published yet. You'll need to give the app a name. I'll use the codename
YellowGreenagain. - Create a banner Ad Unit — AdMob will direct you to create an Ad Unit. Create a Banner - this is the type currently supported by FlutterFlow. You'll need to name it something relevant like 'Banner'. Save and you will see a message that the Ad unit is successfully created. Copy the key beside the Android Logo which is the AdMob Android App ID and paste it in the AdMob Settings for Android in the field 'AdMob Android App Key'. You can find the key again in the AdMob website.
- Connect the banner Ad to AdMob — Now, in FlutterFlow, select the Ad unit in the UI builder and add the specific Ad Unit ID for each of the iOS and Android banners you created in AdMob to this UI widget. This identifies this specific banner widget you created as distinct from the overall AdMob settings you created earlier for this app.
- Run your app on an emulator or real device! — Try it out. Click the View Code button, and the download button. Extract the downloaded Zip and open the resulting folder in your IDE (Android Studio, or VSCodium for example). Run 'Flutter Pub Get' to get dependencies. Then Click 'Run' on your chosen device or emulator.
- I ran on the iOS Simulator and a real Google Pixel 2XL device, everything just worked and I can see the test banner Ad on each device. Setting this up and testing it, including all the administration for AdMob took about an hour, some of that was because I was also writing up each step.
Google Maps in FlutterFlow

You'll need to get maps API keys and paste them in here so as to be able to use Google Maps in your app. The keys are separate for iOS, Android and Web.
Adding Google Maps to the app
To make Google Maps function in an app, you will need an account on Google Cloud Platform, and to enable the Maps API in the Google Maps Platform for your application. Again, this seems complicated but it is straightforward to do.
Signing up for Google Maps
- Open a new browser tab or window to https://console.cloud.google.com/google/maps-apis
- Sign up or sign in - You will need a Google Cloud platform account and to set up a project for this app. I used the project codename 'YellowGreen'
- Once you set up Android and iOS apps in Firebase they should auto create keys for maps. You may need to enable Maps and Cloud Billing first.
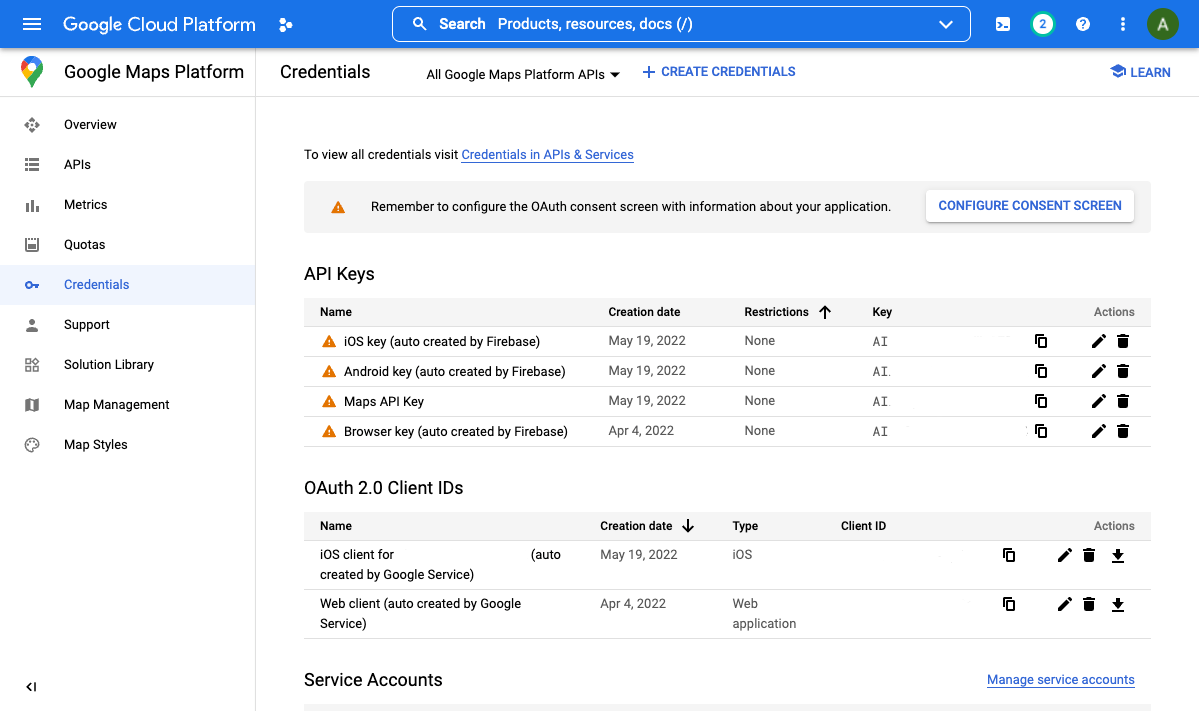
- If you do not see these automatically created credentials you need to enable them manually, you can do so from the 'Maps API and Services' page. You will need to enable three services, the Maps SDK for iOS, the Maps SDK for Android and the Maps JavaScript API which is the equivalent of the SDK for Web. Click each in turn and enable them. Make sure you are in the right project in your Google Cloud Platform account. Once you have enabled them you will need to create the API keys yourself. For each of the three API's click 'Create Credentials', create a key and optionally (but importantly) restrict it to just the API you are working on and make a note that before going to production you will want to come back here to restrict its use to your flutterflow app.
- Once you have created each key, copy it and paste the key into Settings and Integrations, in the Google Maps section (see above).
- Now in FlutterFlow drag and drop the Google Maps widget into the page. We can build this app test that the Maps API key is working on iOS and Android. Why not set the Initial Location Lat and Lng to someplace you know or like.
Push your project FlutterFlow source code to GitHub
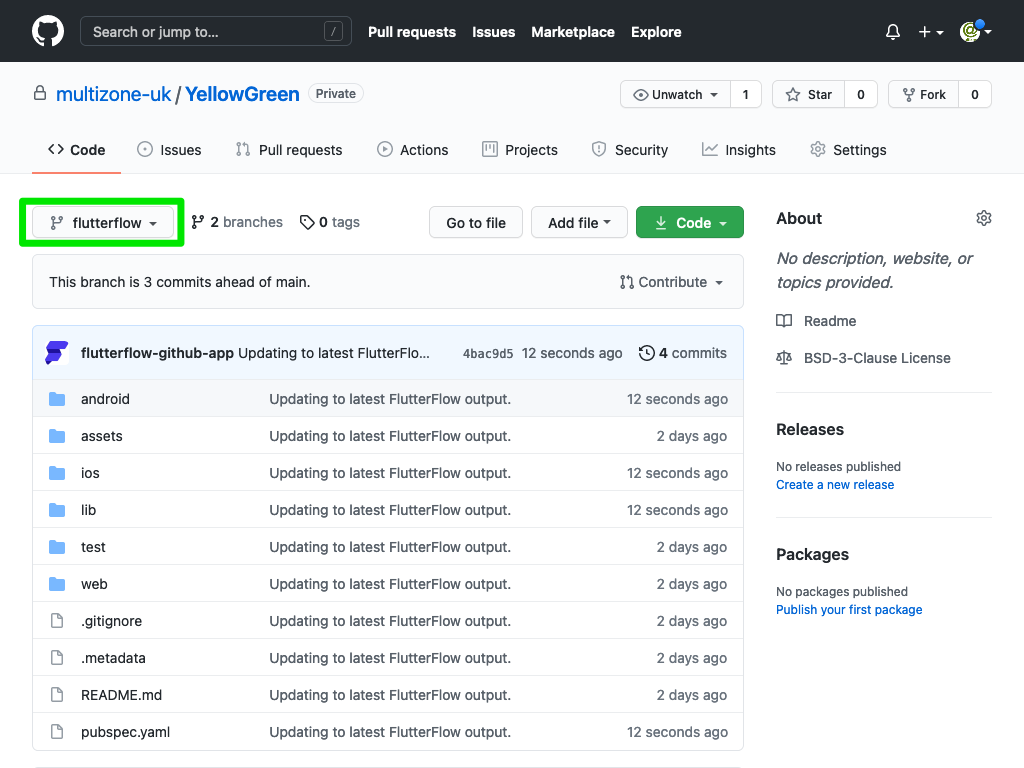
Integrating your project workflow into GitHub lets you push the FlutterFlow code to a flutterflow branch in your GitHub repository. This it one feature alone which makes FlutterFlow very suitable for enterprise or professional software development. This branch is replaced with each updated push, so you have to adapt your workflow to take that into account. This is a critical feature for my devops workflow (which uses Fastlane tools and GoCD). It means you can merge your FlutterFlow branch in to your main branch as you wish, and can integrate easily with your own continuous integration solution to automatically trigger a build if you wish.
GitHub integration settings
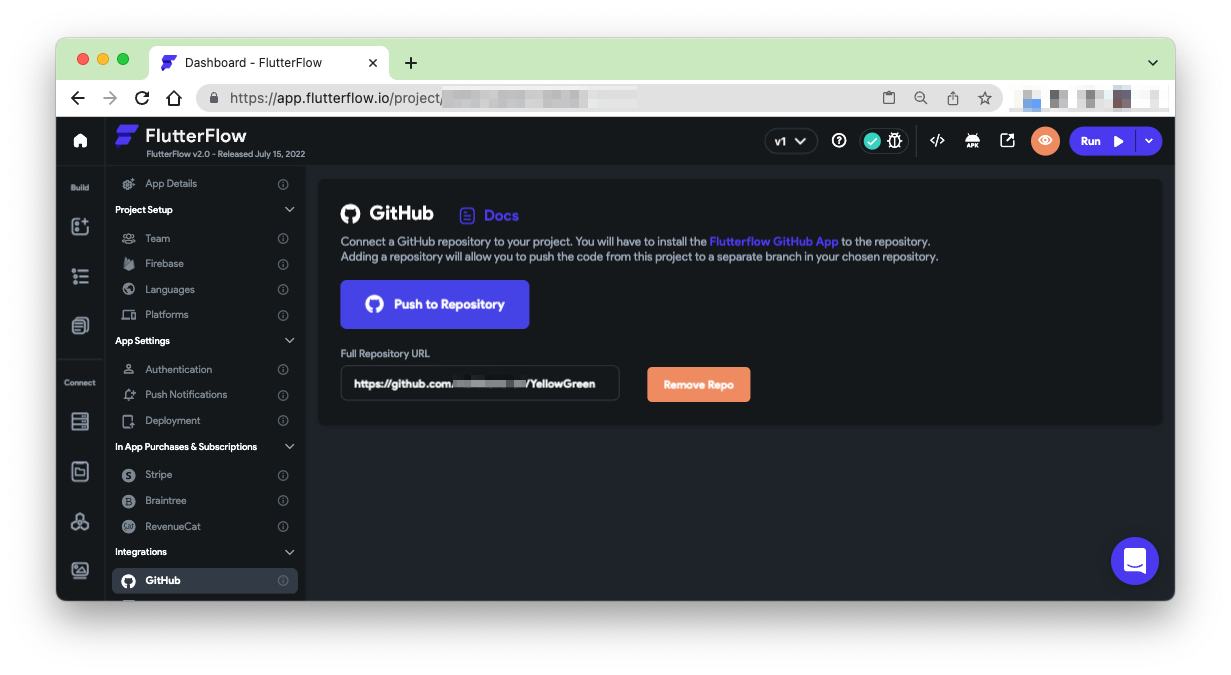
To connect a GitHub reopsitory to your project (Pro Plan subscriptions only), you first have to install the FlutterFlow GitHub App in the repository. Once you have done this you can push your code on demand to a FlutterFlow branch in your GitHub repository.
Setting upFlutterFlow GitHub integration
- Sign in to GitHub, and then
- Set up a new repository for this app. I used the project codename again 'YellowGreen'
- Install the FlutterFlow GitHub app from here https://github.com/apps/flutterflow-github-app into your repo and click 'Install' choosing the repository you created for your app.
- Paste the URL of you repository into the 'Full Repository URL' field in FlutterFlow GitHub settings
- Now you should see the blue 'Pust to Repository' button
- Click the button
- Examine your project's flutterflow branch in GitHub, you have to switch to the branch to find it.
Create the app pages using FlutterFlow
Home page

The home page is easy to create. Create it and drag a Floating Action Button (FAB) widget onto the page. Make the FAB 'extended', and add the icon and text. Style the FAB background as Primary with Primary Text. If you set up your theme properly dark mode/appearance will 'just work'!
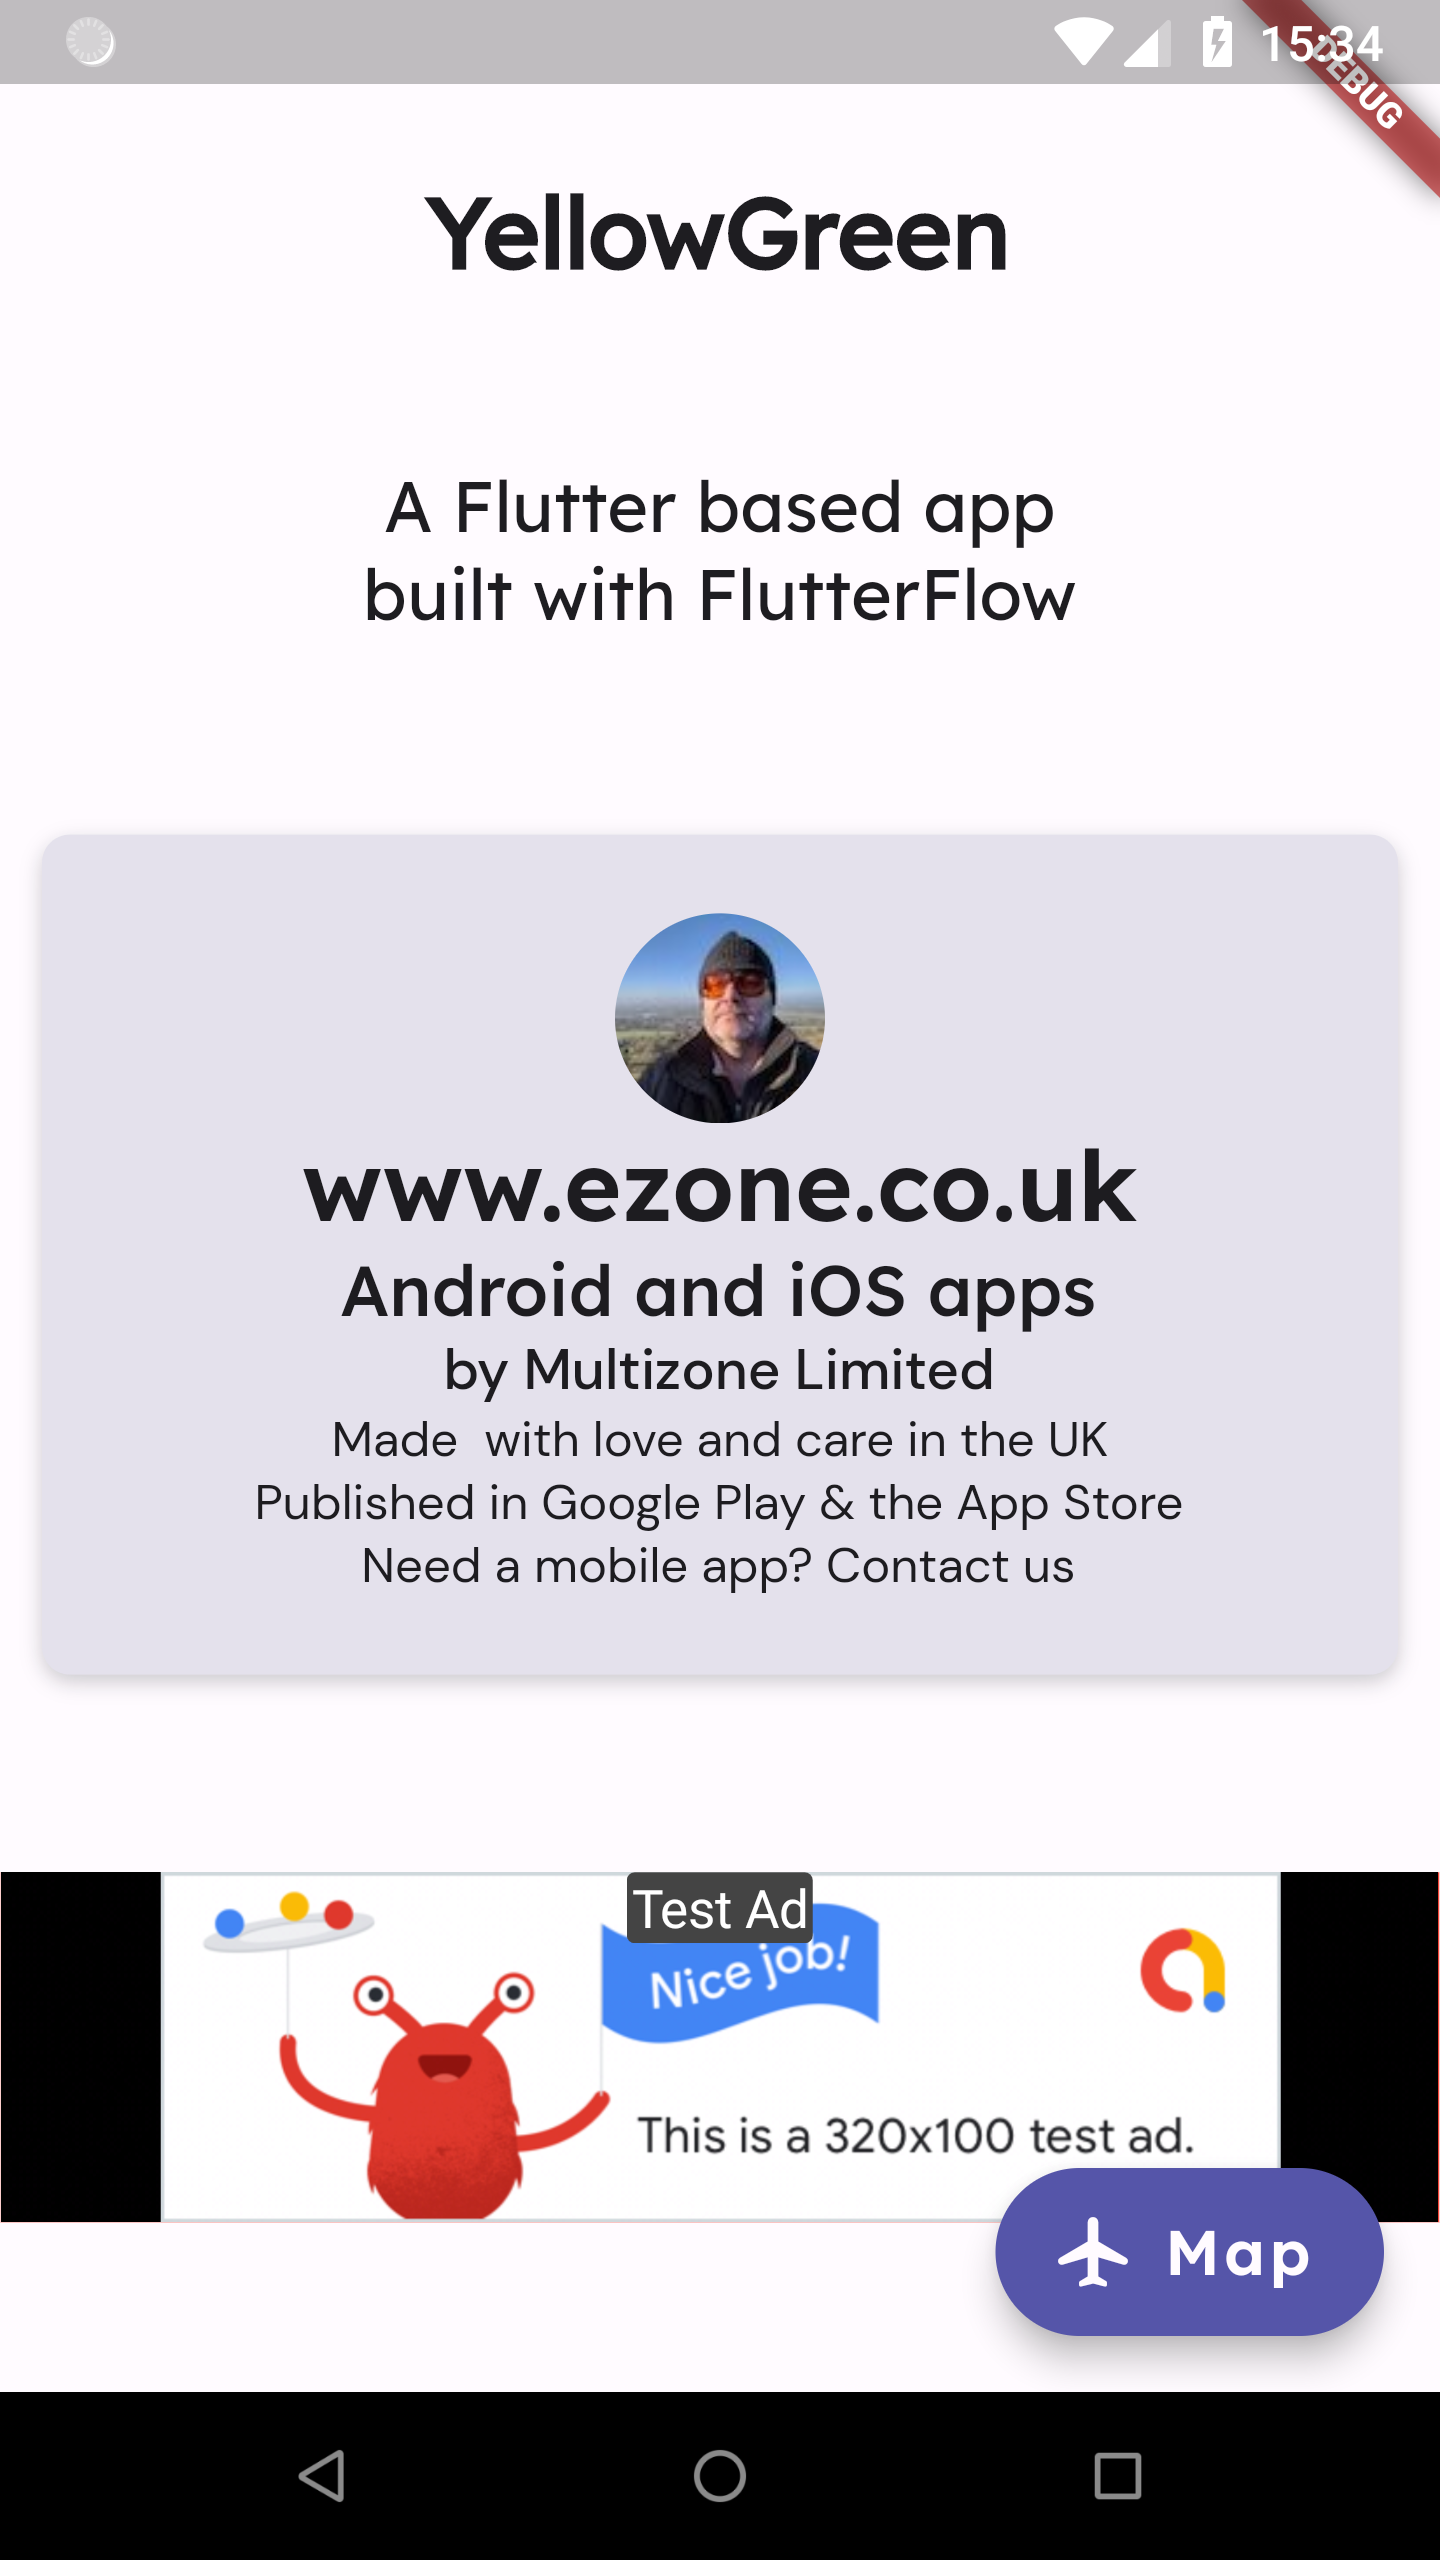
Now add a column and set it to 'space evenly'. In it place two text items, one for the Title, in theme text style 'Title 1', and the other for the Subtitle, in theme text style 'Title 3'. Now add a container, like my business card. You can use one of the pre-set templates if you like. The container comprises columns images and text too, all styled with the theme. Finally add an Ad Banner widget, set to 100% width and height and with the values for the iOS Ad Unit and the Android Ad Unit that you can get from Google AdMob. In the designer the AdBanner is always red.
Pro Tip: You can turn the card and the Ad Banner widgets into components and reuse them on your other pages. If you do so you'll only need to make changes once, to the components and the changes will appear everywhere the component is being used.
Map page
The page the floating action button (FAB) navigates to.

The map page is simple. Drag an AppBar widget onto the page. Set the background to Primary. Drag the Google Map widget, set its initial location somewhere interesting. I chose a local airport. Add your card and ad banner components or recreate them. Thats it!
Build your Flutter based app
Download the app to your local computer

Prepare your app to run locally
- Click the download code button to get a local copy of your code
- Uncompress the zipfile
- In terminal cd to the resulting folder and
- Type flutter pub get and
- Then type flutter packages pub run build_runner build --delete-conflicting-outputs
- This prepares your flutter project to be able to run by generating the code required to compile the project
Run it on an emulator or real device
- Just type flutter run
- Optionally you can choose a device from your device list by first running flutter devices and then running flutter run -d yourdevicename.
- See below for screenshots of the sign-in page and the home page.

Sign-in page
FlutterFlow based Flutter App with AdMob test ad component, and an ezone business card component on an iOS Simulator.
Home page
FlutterFlow based Flutter App with AdMob test ad component, and an ezone business card component on an Android device.

