
Push notifications remain one of the clearest dividing lines between a prototype and a production app — and in 2026, FlutterFlow makes them more accessible than ever, though the setup still demands care and attention.
Push notifications add real depth to any FlutterFlow app. Under the hood, FlutterFlow relies on Firebase Cloud Messaging (FCM) from Google — a cross-platform messaging solution that remains free to use at scale. This article assumes you already have Firebase connected to your FlutterFlow project. FlutterFlow's built-in push notification tooling has matured significantly over the past couple of years, but you will still need to navigate Apple's certificate and provisioning profile requirements carefully. That part hasn't changed.
TL:DR – FlutterFlow apps with push notifications read as professional, production-grade products. The FlutterFlow team has simplified the process considerably heading into 2026, but there are still moving parts — particularly on the Apple side. Budget time for that.
Contents
- What's changed in 2026
- Things you will need
- Enable push notifications in FlutterFlow
- Firebase authentication in your FlutterFlow project
- Configure Apple Push Notifications (APNs) in the Apple Developer portal
- Add your APNs key to Firebase Cloud Messaging
- Handling notification permissions in your app
- Send a push notification to a real device and verify receipt
- Troubleshooting common issues in 2026
What's changed in 2026
FlutterFlow has made meaningful strides in its push notification implementation since this guide was first written. A few things worth knowing before you dive in:
- Scheduled and targeted notifications are now supported directly from the FlutterFlow interface, reducing the need to drop into the Firebase console for anything beyond basic sends.
- FCM v1 API is now the only option. Google deprecated the legacy FCM HTTP API in 2024 and fully retired it in 2025. FlutterFlow's cloud functions have been updated to use the FCM v1 API, but if you have an older project you may need to redeploy your cloud functions to pick up the change.
- Firebase's Blaze plan remains required for cloud functions, but pricing has not materially changed for typical indie or small-team usage — most apps stay well within free-tier function invocation limits.
- Android 13 and later require explicit notification permission at runtime, similar to iOS. FlutterFlow's generated code now handles the permission request on both platforms automatically, but you should review the user experience around when and how you prompt.
- Apple's APNs key-based authentication (as opposed to the older certificate-based approach) is now the only method Firebase supports. If you set this up recently, you are already using keys. If your project is older, check your Firebase console — the certificate-based flow is no longer accepted.
Things you will need
- An Apple Developer account (individual or organisation). Choose your organisation name carefully — it is not straightforward to change later and appears in your App ID.
- A Firebase project on the Blaze (pay-as-you-go) plan. Cloud functions are required to route push notifications, and the Blaze plan is the minimum tier that supports them. For most small apps, actual spend remains negligible.
- A Mac and a physical iOS device for testing iOS push notifications. Simulators do not support push. Any Apple Silicon or Intel Mac running a recent macOS, and any iPhone from roughly 2020 onwards, will work fine.
- Your FlutterFlow project already connected to Firebase. If you haven't done that yet, complete the Firebase setup first.
Enable push notifications in FlutterFlow
- In your project, open App Settings and select Push Notifications.
- Toggle on Enable Push Notifications.
- Click Deploy. This provisions the Firebase Cloud Functions that handle notification routing. If you are working from an older project, redeploying here also updates your functions to the FCM v1 API.
Once deployed, FlutterFlow will confirm the functions are live. If you see errors at this stage, the most common cause is that your Firebase project is not on the Blaze plan, or that billing hasn't been fully activated on the Google Cloud project linked to Firebase.
Firebase authentication in your FlutterFlow project
FCM needs a way to identify individual devices in order to route notifications to them. In FlutterFlow, enabling Firebase Authentication — specifically Anonymous sign-in — is the minimum required to make this work. Anonymous authentication creates a unique user identifier for each device without requiring the user to register or log in. That identifier is what FCM uses to target a specific device.
If your app already has full authentication (email, Google Sign-In, Apple Sign-In, and so on), anonymous sign-in is not strictly necessary — authenticated users are already identifiable. But for apps where some users remain unauthenticated, anonymous sign-in ensures every device can still receive push notifications.

Configure Apple Push Notifications (APNs) in the Apple Developer portal
This is the section that trips most people up, and it is worth going slowly. Apple's developer portal has been reorganised a few times, but the steps below reflect how it works in 2026.


- Go to developer.apple.com and sign in.
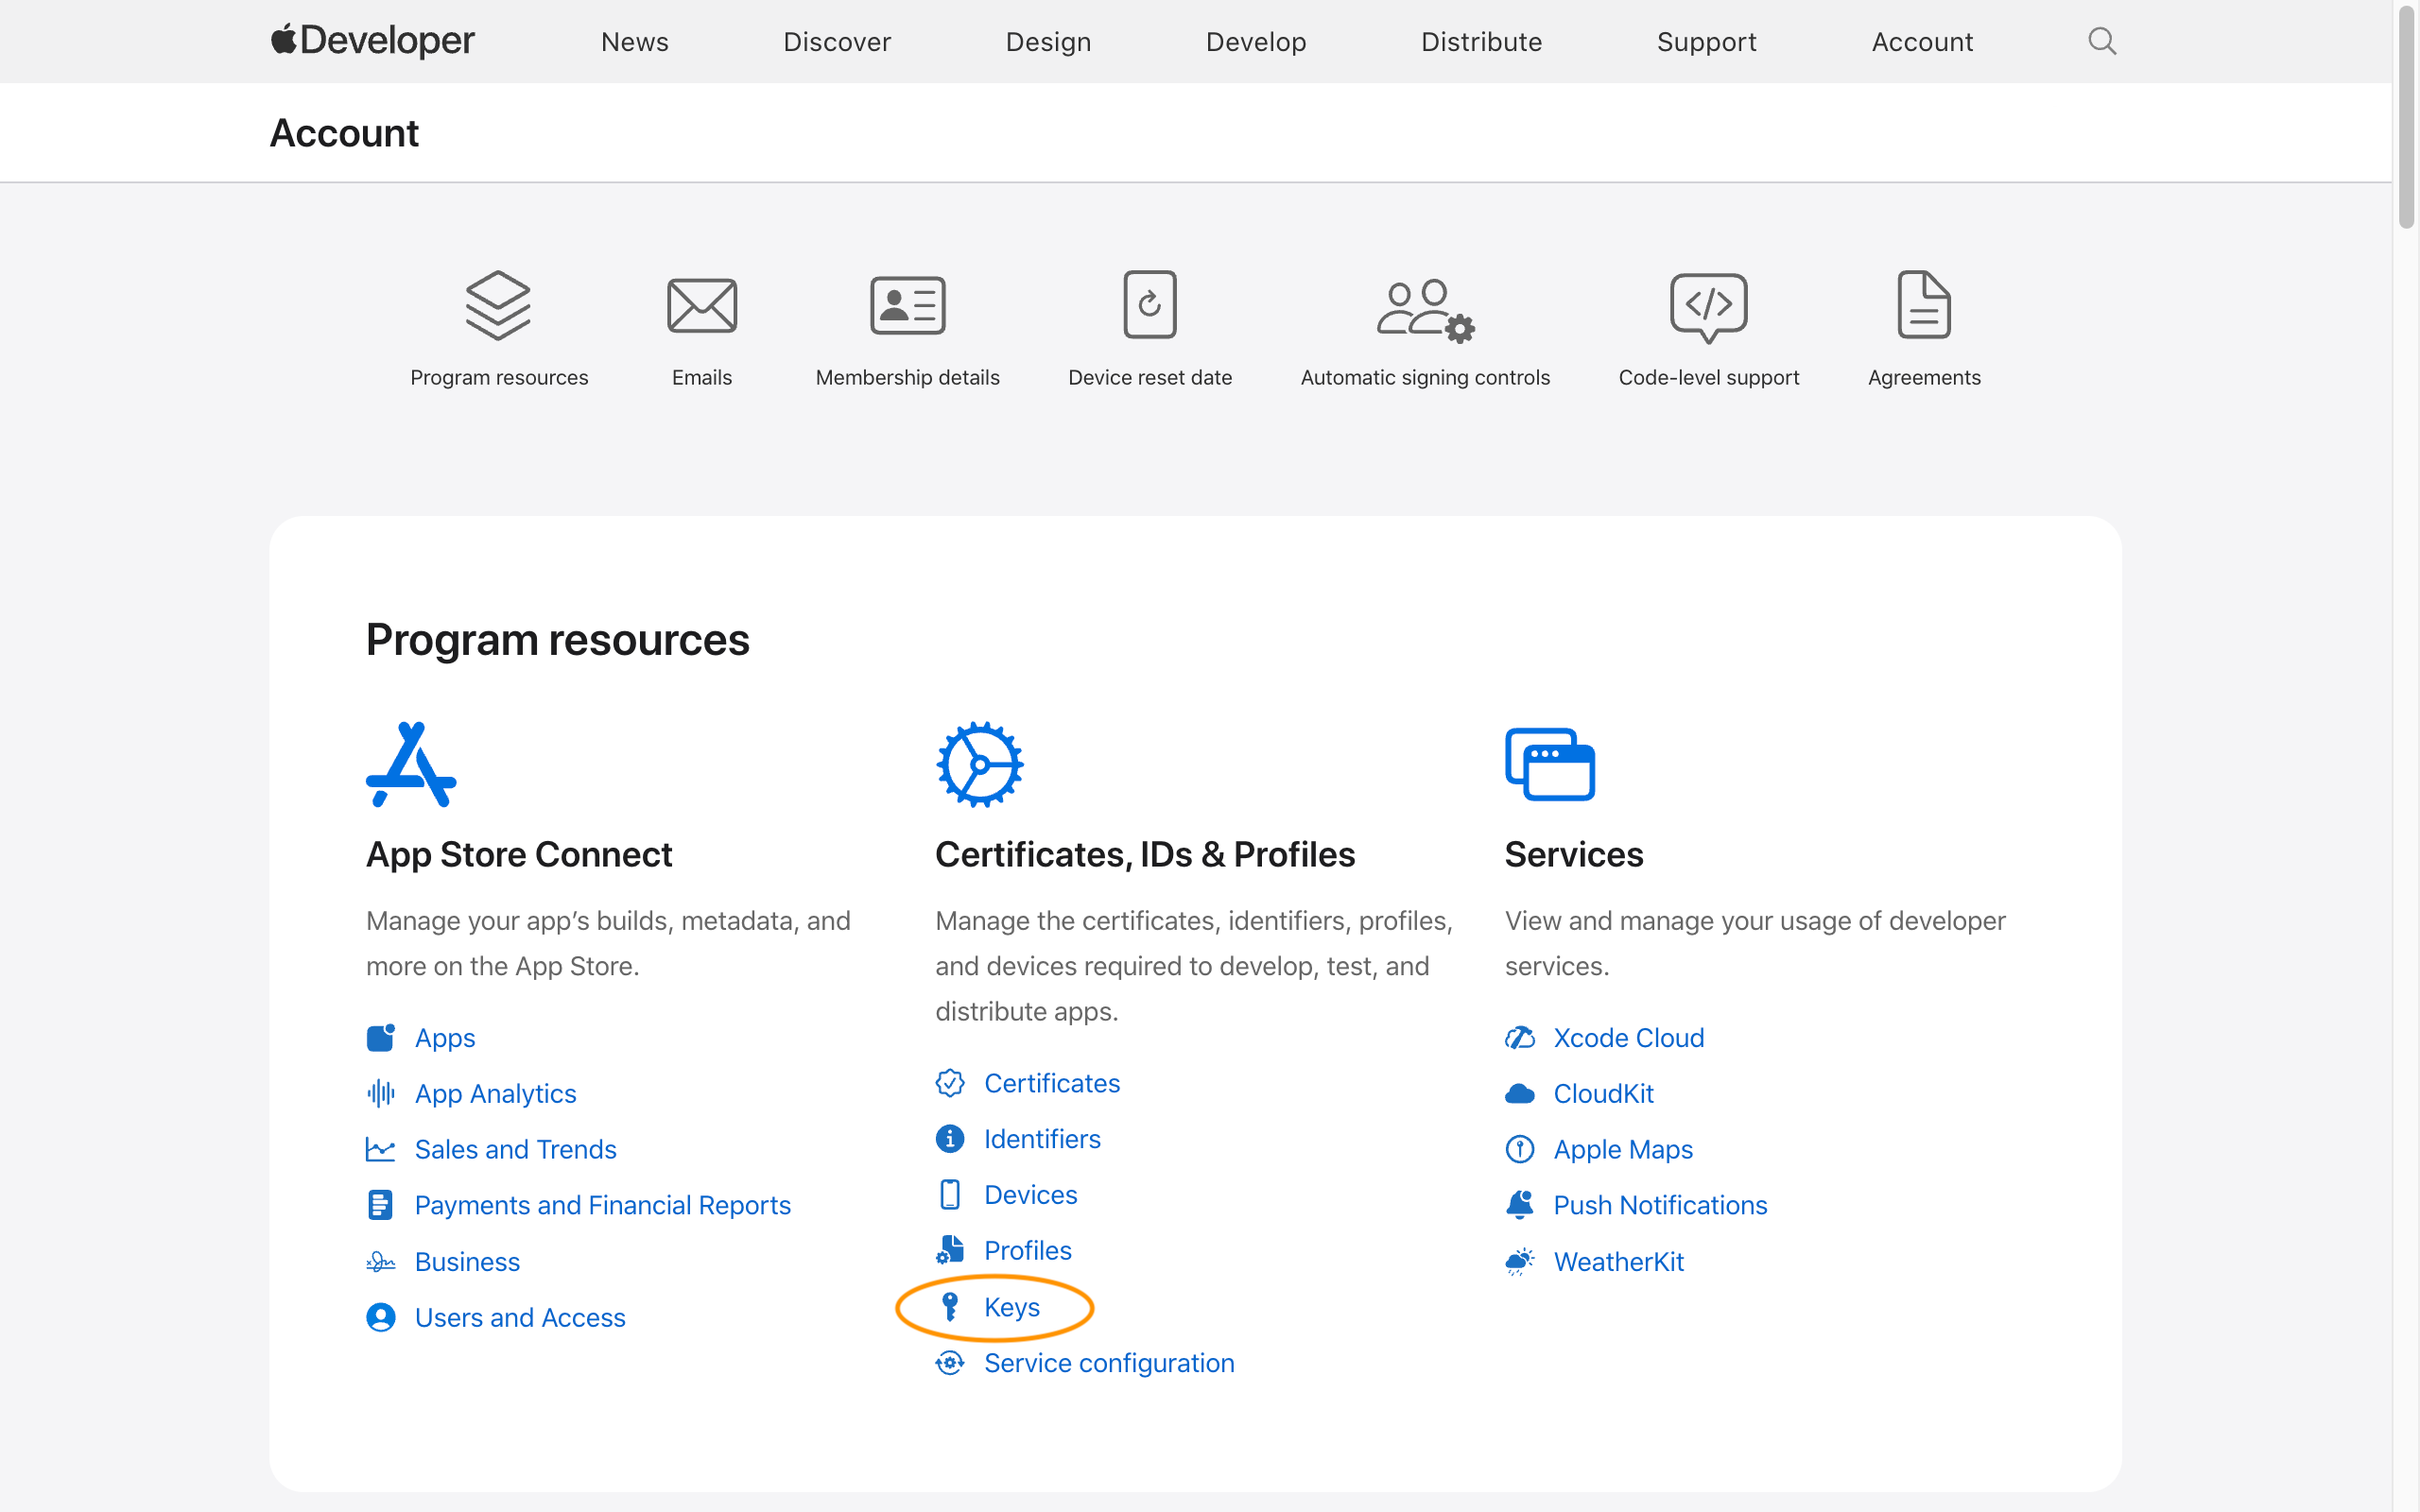
- Navigate to Certificates, Identifiers & Profiles, then select Keys.
- Press the + button to create a new key.
- Give the key a clear name (something like MyApp FCM APNs Key), enable Apple Push Notifications service (APNs), and press Continue.
- Review and click Register, then Download your key file (
.p8). This is your only opportunity to download it. Do not close the browser tab until the key is safely uploaded to Firebase. - Note your Key ID and your Team ID (visible in the top-right of the developer portal under your account name) — Firebase will ask for both.
- Next, go to Identifiers, find your App ID, click it, scroll to Push Notifications, enable it, and save.
Add your APNs key to Firebase Cloud Messaging
With your key downloaded, head to the Firebase console.
- Select your project, then go to Project Settings (the gear icon).
- Open the Cloud Messaging tab.
- Under the Apple app configuration section, upload your
.p8key file and enter your Key ID and Team ID. - Save. Firebase will confirm the key is applied.

Handling notification permissions in your app
As of Android 13 and iOS 10 and later, users must explicitly grant permission for an app to display push notifications. FlutterFlow's generated code includes a permission request flow for both platforms, but you have control over when that prompt appears. Best practice in 2026 is to request permission contextually — that is, at a moment in the user journey where the value of notifications is obvious — rather than firing the prompt the instant the app opens. A cold permission request on first launch is one of the most reliable ways to get a denial.
In FlutterFlow, you can trigger the permission request using the Request Notification Permissions action, which you can attach to any button or page event. Place it thoughtfully.
Send a push notification to a real device and verify receipt
If you have worked through all of the above, you are ready to send your first push notification.

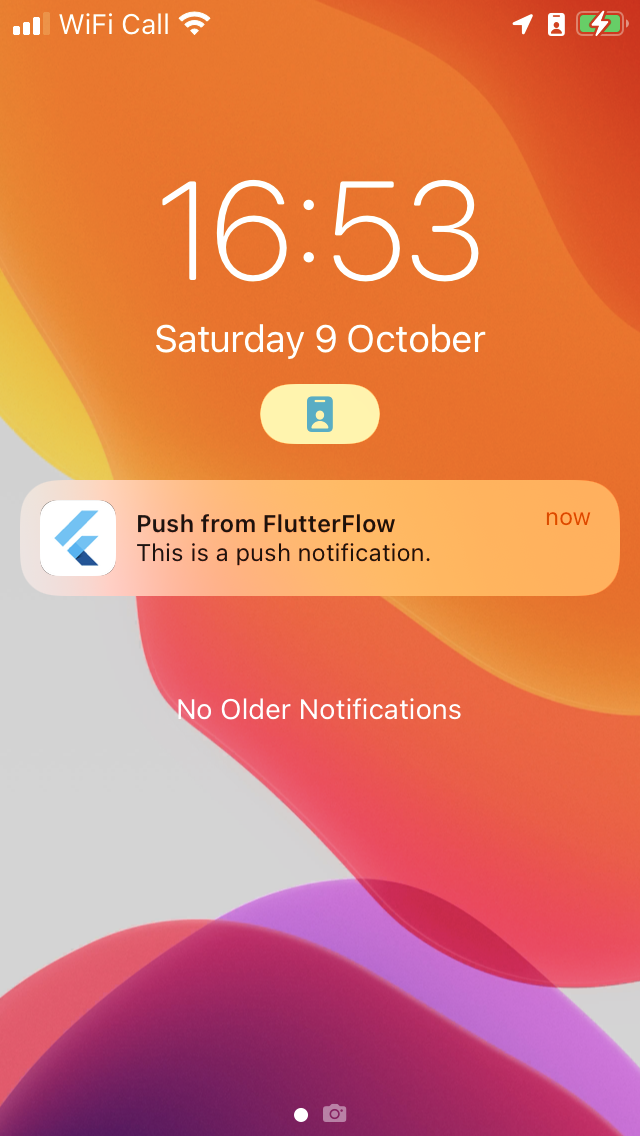
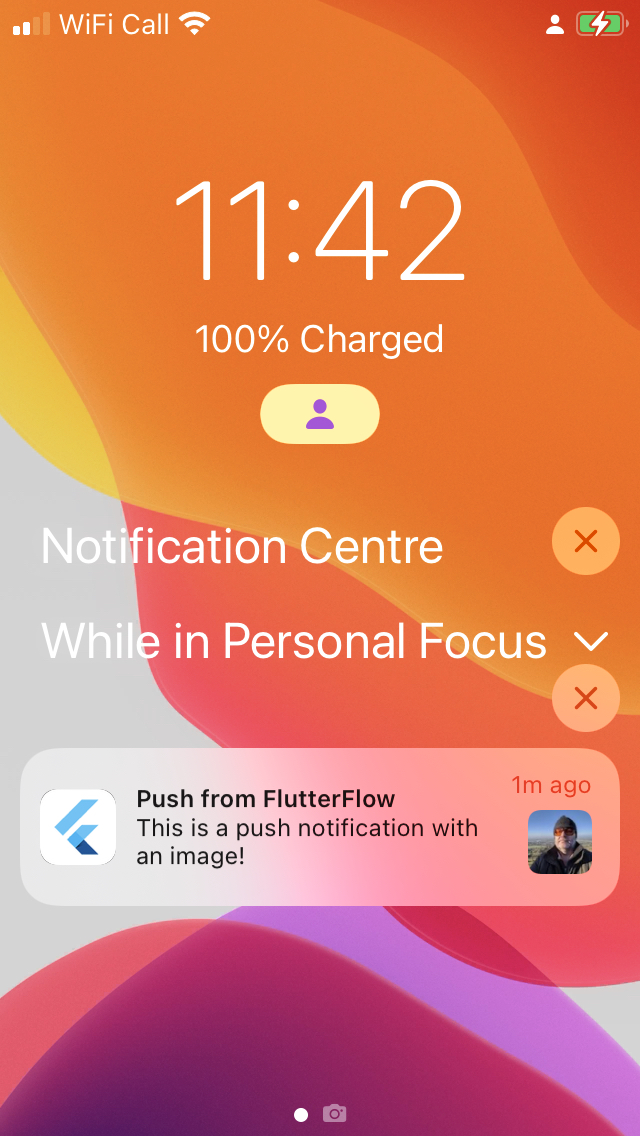
From within FlutterFlow, navigate to the Push Notifications section. You can address a notification to all users, to a specific user, or to users matching a condition. Fill in a title, body, and optionally an image URL, then send. Within a few seconds you should see the notification arrive on your test device.

Troubleshooting common issues in 2026
The setup is reliable once complete, but a few issues come up repeatedly:
- Notifications not arriving on iOS: The most common cause is that the APNs key was not uploaded correctly, or the Team ID and Key ID don't match. Double-check all three values in the Firebase console.
- Cloud function deployment errors: Ensure your Firebase project is on the Blaze plan and that the Google Cloud project has billing enabled — not just Firebase billing. They are linked but sometimes need to be activated separately.
- Android notifications not showing: Confirm that the user has granted notification permission (Android 13+) and that your app's notification channel is configured. FlutterFlow handles channel creation, but if you have customised the generated code, verify it hasn't been removed.
- Old FCM legacy API errors: If you see references to
https://fcm.googleapis.com/fcm/sendin your logs, your cloud functions are using the deprecated legacy API. Redeploy from FlutterFlow's Push Notifications settings to update them.