Multizone | All our technotes
If we've published it, you can find it here.
Kali NetHunter
Kali NetHunter is an Android ROM overlay for a rooted, supported device, that includes a robust Mobile Penetration Testing Platform. It comprises tools from Kali Linux as well as some additional android specific functionality. As well as a command line, it has the ability to get a full VNC session from your phone with access to these sophisticated tools for pen testing your environment or one you have permission to assess.
This article is about installing on the Nexus 7 with the pre-built image. If you have a compatible device you can turn it into a portable, dirt cheap penetration testing platform.
TL:DR— This requires an advanced understanding of Android firmware, and you may well have to flash your device back to OEM firmware more than once befode you can make it work so you should be proficient at that process but if you have a supported device it is a well maintained invaluable tool for the information security professional.
- Details
iOS 14.4.2 and iPadOS 14.4.2
iOS 14.4.2 is a security update available for: iPhone 6s and later, iPad Pro (all models), iPad Air 2 and later, iPad 5th generation and later, iPad mini 4 and later, and iPod touch (7th generation)
TL:DR— Install right away. Security fixes.
- Details

Why a Mac Mini in 2026?
The Mac mini has quietly become one of Apple's most compelling desktop computers. What started as a budget entry point has evolved into a genuinely powerful machine — and with Apple Silicon now several generations deep, it remains an outstanding choice for developers, creatives, and anyone who wants serious desktop performance without the price tag of a Mac Studio or Mac Pro. This guide documents the setup process and key customisations for macOS on a Mac mini, updated for 2026.
The original version of this article was written when the M1 Mac mini arrived in late 2020 — a landmark moment, as it was the first desktop Mac to ship with Apple's own silicon. Since then, the Mac mini has been updated through M2 and M4 generations, each bringing meaningful gains in CPU throughput, GPU performance, and machine learning acceleration. If you're setting up a Mac mini today, the core macOS configuration steps remain broadly the same, but the hardware, the software, and the security landscape have all moved on.
TL;DR macOS setup steps and security hardening, updated for current hardware and macOS versions. Might save someone an afternoon.
{ToC}
What's changed since the M1 was introduced in 2020
When Apple introduced the M1 Mac mini in November 2020, it was a significant moment. The M1 chip was the first in a new family of processors Apple designed specifically for the Mac, and the performance jump over the Intel models it replaced was substantial — Apple cited up to 3.5× faster CPU performance, up to 6× faster GPU performance, and up to 15× faster machine learning compared to the previous generation.
M1 is the first in a family of chips designed by Apple specifically for the Mac. It is by far the most powerful chip we have ever made.
By 2026, the Mac mini line has moved well beyond M1. The current models ship with Apple Silicon that makes the original M1 look modest by comparison. The base configuration now offers more unified memory than the M1's maximum of 16 GB, and storage options have expanded accordingly. If you are buying new, you are getting a meaningfully faster machine — but the setup process and macOS hardening advice in this guide applies across all Apple Silicon Mac mini models.
On the software side, macOS has also moved on considerably since Big Sur. The System Preferences application was redesigned and renamed System Settings in macOS Ventura, and that redesign has been refined further in subsequent releases. All navigation paths in this guide reflect the current System Settings layout rather than the old System Preferences structure.
Specification
The steps in this guide were originally documented on a Mac mini with 16 GB unified memory and 512 GB of storage, running macOS Big Sur. They have since been updated to reflect current macOS releases. If you are setting up a current Mac mini, your configuration options will differ — unified memory and storage tiers have expanded — but the process is the same.
To check your own specification at any time, go to the Apple menu and choose About This Mac. This gives you a summary of your chip, memory, and storage.
Initial setup
The Setup Assistant walks you through country and region, accessibility options, network configuration, and Apple ID sign-in. It has been refined over successive macOS releases and is straightforward. Take your time with the accessibility options — they are easy to skip past but worth reviewing, particularly display scaling and pointer settings if you are coming from a different platform.
One thing that has not changed: macOS will assign your Mac a default computer name — something like "Angus's Mac Mini" — and does not prompt you to change it during setup. For anyone who manages multiple machines, or simply prefers tidy hostnames, fix this immediately.
Setting the computer name from the command line
% scutil --set ComputerName "m1n1"
% scutil --set LocalHostName "m1n1"
% scutil --set HostName "m1n1"
Replace m1n1 with whatever name suits your setup. Keep it lowercase, keep it short, and make it recognisable — especially if it will appear in terminal prompts, SSH configs, or local network discovery.
Hardware considerations
Steve Jobs coined "BYODKM" — Bring Your Own Display, Keyboard and Mouse — when the Mac mini launched in 2005, and it still holds. The box contains a power cable and nothing else. Plan accordingly.
The current Mac mini ships with a front-facing USB-C port alongside its rear ports, which makes connecting peripherals more convenient than on earlier models. Thunderbolt 4 and USB-C connectivity is now standard, so a modern USB-C or Thunderbolt hub is a worthwhile investment if you have several peripherals. HDMI output is retained for display connectivity.
A USB switch — a hardware device that lets multiple computers share a keyboard, mouse, and other USB peripherals — remains a practical solution if the Mac mini is one of several machines on your desk. These require no drivers and work reliably. Bluetooth keyboards and mice are fine for most users, but if you prefer wired peripherals for reliability or security reasons, a USB switch keeps things manageable.
Wired Ethernet is worth using where available. The Mac mini includes a Gigabit Ethernet port (upgradeable to 10 Gigabit on higher-end configurations), and a wired connection is more stable and more secure than Wi-Fi for a desktop machine that rarely moves.
Security hardening
The following settings are worth reviewing on any new Mac setup. Navigation paths reflect the current System Settings layout in recent versions of macOS. Where a setting has moved since older guides were written, the current location is noted.
- Handoff — Handoff routes data through Apple's servers to work across devices. If you value privacy over convenience, disable it in System Settings → General → AirDrop & Handoff and turn off "Allow Handoff between this Mac and your iCloud devices".
- Guest User — Go to System Settings → Users & Groups. Guest User should be off by default; confirm it is disabled.
- Diagnostics and analytics — Disable sending usage data to Apple in System Settings → Privacy & Security → Analytics & Improvements. Uncheck options for sharing Mac analytics, iCloud analytics, and Siri & Dictation improvement data.
- Privacy permissions — Review app permissions periodically in System Settings → Privacy & Security. Pay particular attention to Location Services, Microphone, Camera, and Accessibility. If an app has Accessibility access and you don't know why it needs it, revoke it.
- Screen lock — In System Settings → Lock Screen, set "Require password after screen saver begins or display is turned off" to Immediately or 5 seconds. The shorter the interval, the better.
- Firewall — Enable the firewall in System Settings → Network → Firewall. Turn it on. Developers may need to add exceptions for local development tools, but the default settings are appropriate for most users.
- FileVault — Enable full-disk encryption in System Settings → Privacy & Security → FileVault. On Apple Silicon Macs, FileVault encryption is tightly integrated with the Secure Enclave and the performance impact is negligible. There is no good reason not to enable it. Note: the initial encryption pass can take a long time on large drives. Start it when you can leave the machine running — a Friday evening is a reasonable suggestion.
- Network interfaces — Reduce your attack surface by disabling unused network interfaces in System Settings → Network. If you are using wired Ethernet, you may not need Wi-Fi active at all times. Turn Bluetooth off entirely if you have no Bluetooth peripherals.
- Spotlight and Siri suggestions — In System Settings → Siri & Spotlight, review what Spotlight is permitted to search and whether Siri Suggestions are enabled. Siri Suggestions send your search queries to Apple. Disable them if you prefer your searches to stay local.
- Passwords and passkeys — macOS now includes a built-in Passwords app (introduced in macOS Sequoia) as a standalone password manager, separate from the Keychain. Review it in System Settings → Passwords and consider whether it meets your needs, or whether you prefer a third-party manager. Either way, use a password manager — do not reuse passwords.
- Automatic updates — In System Settings → General → Software Update, enable automatic security responses and system data file updates. These are low-risk updates that Apple can deliver rapidly in response to active threats, without requiring a full OS update.
Finder customisations
A few Finder adjustments that make day-to-day use more sensible:
- Open Finder → Settings (previously Preferences) and set new Finder windows to open your home folder rather than Recents.
- Enable "Show all filename extensions" in the Advanced tab. This avoids surprises when dealing with files that have misleading icons.
- Show hard disks and external drives on the desktop — useful for quick access and as a visual reminder of what is mounted.
- In View Options (with no window open, so changes apply to the desktop), adjust grid spacing and text size to your preference, and turn on item info to show file sizes beneath icons.
- In the Finder sidebar, review which locations and tags are shown. Remove anything you never use — it keeps the sidebar readable.
Further reading
Apple's official documentation for the Mac mini is maintained and kept current at support.apple.com/guide/mac-mini.
- Details

Data loss remains one of the most stressful experiences a computer user can face, whether caused by hardware failure, accidental deletion, or something more sinister like ransomware. In 2026, GNU ddrescue remains the gold standard for low-level data recovery on Linux — a battle-tested tool that has been actively maintained for over two decades. This guide walks you through the full recovery workflow on Ubuntu Linux: diagnosing your drive with smartctl, visualising your disk layout with GParted, and performing the actual rescue with GNU ddrescue. Where relevant, we also cover DDRescue-GUI, a paid graphical front-end that makes the process considerably more approachable.
TL;DR — GNU ddrescue provides the most reliable way to copy as complete an image as possible from a failing drive, minimising the risk of catastrophic data loss. Before you reach for it, though, check your drive with GParted and smartctl from smartmontools. If the drive is actually healthy, you may be able to simply mount it and copy your files the normal way — no imaging required.
- Details
Read more: Tips for Recovery Success Using GNU ddrescue on Ubuntu Linux

Bootstrap Studio
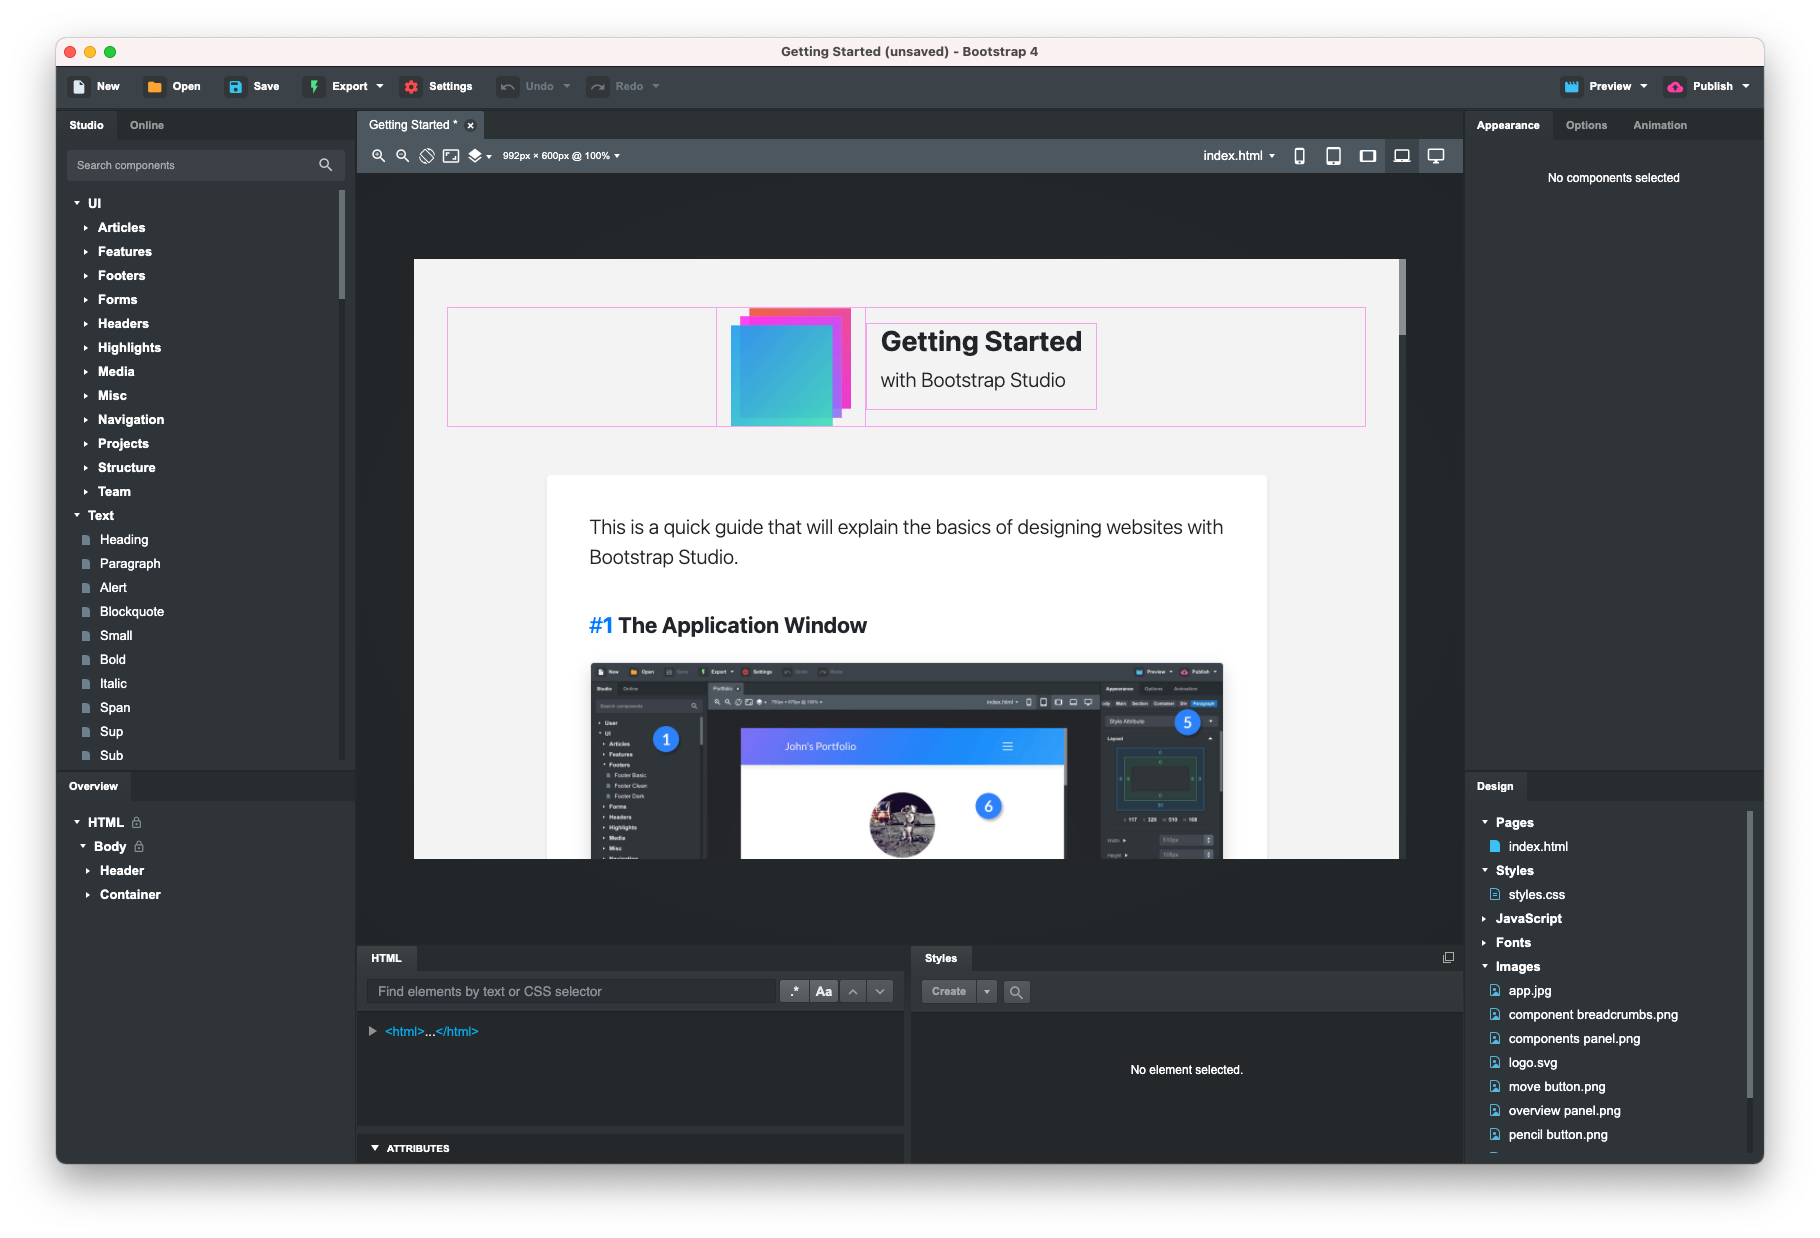
Bootstrap Studio is a powerful desktop application for designing responsive websites using the Bootstrap framework — and in 2026 it has evolved into one of the most capable visual web editors available, now with built-in AI assistance.
It is a drag-and-drop editor that makes working with Bootstrap genuinely enjoyable. The app is built to lower the barrier to adopting Bootstrap, exports clean HTML, and has maintained a steady cadence of meaningful updates since its launch. It is an independent product — not made by the Bootstrap core team — but it tracks the framework closely and supports Bootstrap 5 throughout.
TL;DR It is very, very good — and in 2026, it just got smarter.
{ToC}
What's new in 2026
Bootstrap Studio has been actively developed right up to the present. Version 8.0.0, released in February 2026, was a landmark update that introduced an AI Assistant directly into the editor. The AI Assistant supports models from Google, Anthropic, OpenAI, OpenRouter, and even locally hosted models — giving you flexibility over which AI backend you use and how much you spend on it. Crucially, it works with your own API key and imposes no usage limits within the app itself.
Version 8.0.1 followed in March 2026, updating the model list to include the latest releases from OpenAI, Anthropic, and Google Gemini, keeping pace with the rapidly moving AI landscape. Two premium templates — Freshify and App Toolkit — were also added in the 8.0.0 release, expanding the template library further.
Earlier, version 7.1.0 (June 2025) added the Swiper component — a polished, touch-friendly slider — along with three premium templates: Agency Creative, Disrupted, and Healthy Colors. The release cadence has been consistent and the changelog remains well written, which continues to be a strong signal of a healthy, maintained product.
Licensing and installation
Bootstrap Studio is available as a one-time purchase with a lifetime licence that includes free upgrades. The pricing has shifted since the app first launched — check the official site for the current figure, as it has been updated over time — but the value proposition remains strong given the quality and regularity of updates. There is also a free trial version that runs in the browser, so you can get a genuine feel for the workflow before committing.
The app supports Windows, macOS, and Linux. The Linux AppImage continues to work well, including on Chromebook hardware. Download it, run chmod a+x filename in the terminal, and you are up and running.
The forum remains active and the release notes are detailed — both signs of a product that is genuinely cared for by its developers. After years of use, the stability record is excellent. No crashes, no lost work, no rough edges that make you distrust the tool.
One workflow that holds up particularly well: paste HTML from a CMS like Joomla into the editor, improve it with proper Bootstrap components, export clean HTML, and bring the relevant parts back into your CMS. Bootstrap Studio was not designed as a CMS companion, but it handles that role gracefully.
AI Assistant
The headline addition in version 8.0.0 is the AI Assistant, and it is worth discussing on its own terms. Rather than locking you into a proprietary AI service, Bootstrap Studio lets you connect to the model of your choice — OpenAI, Anthropic Claude, Google Gemini, OpenRouter, or a local model running on your own hardware. You supply your own API key, so there are no additional subscription fees baked into the app and no artificial caps on how much you can use it.
This is a sensible approach. It means the feature stays useful as the AI model landscape continues to shift, and it gives privacy-conscious users the option to keep everything local. The March 2026 update (8.0.1) already refreshed the model list to reflect new releases, demonstrating that the team intends to keep this feature current.
AI Assistant — supports models from Google, Anthropic, OpenAI, OpenRouter and local models. Works with your own API key and imposes no limits.
Templates
Bootstrap Studio ships with a well-developed set of templates that demonstrate both the power of the Bootstrap framework and the capabilities of the editor itself. The library has grown substantially and now includes premium templates covering a wide range of design styles — from clean agency layouts to bold typographic treatments.


Select a template, choose your Bootstrap version, and start editing. Adding components, adjusting properties, and rearranging layouts is intuitive enough that you spend your time making design decisions rather than fighting the tool. Recent additions like the Swiper component and the Freshify and App Toolkit templates show the team is still expanding what ships out of the box.
Real-time preview
Bootstrap Studio lets you preview your design across different device sizes as you work, with the option to have multiple windows open simultaneously showing live changes. This makes responsive thinking a natural part of the process rather than an afterthought — you see immediately how a layout shift or component change affects a mobile view alongside a desktop one. For anyone building Bootstrap sites regularly, this alone justifies the tool.
Verdict
Bootstrap Studio was already a strong choice when it launched, and it has only improved with time. The 2026 release cycle — with AI assistance, an expanding component library, and a growing template catalogue — shows a product that is keeping pace with how web development is actually evolving. The one-time licence model, combined with a genuine commitment to free updates, makes it an unusually good deal in a market increasingly dominated by monthly subscriptions.
If you are building Bootstrap-based sites, whether for a CMS, a static project, or a client deliverable, Bootstrap Studio deserves a serious look. The free trial runs in the browser with no commitment required.
- Details

Don't like the blank screen? XScreenSaver is still the answer in 2026.
Ubuntu has shipped a blank screen as its default screensaver for as long as most of us can remember. I have never warmed to it. When a machine is sitting idle — especially a remote one — I want to see something that tells me it is alive. XScreenSaver has been my answer to that for decades, and in 2026 it remains the best cross-platform screensaver available. It runs on Linux, macOS, iOS, and Android, and the current release is version 6.15.
XScreenSaver has been the de facto standard screensaver for Linux and Unix systems for a long time. It arrived on macOS in 2006, iOS in 2012, and Android in 2014. There is still something quietly satisfying about running the same screensaver across every machine and device you own.
Downloads are available at jwz.org/xscreensaver, on the iOS App Store, and via your Linux package manager — though read the notes below before you reach for apt.
- Ubuntu Linux — Install from the repository, or grab a more current
.debfrom the Debian unstable channel - Android — Download the APK directly from the author's website (no longer on Google Play)
- macOS — Install via the DMG from the developer's website (not on the Mac App Store)
- iOS — Free on the App Store
TL;DR — Let's install them all, via the simplest methods. You can compile from source on Linux and Unix if you need deeper customisation, but for most people the pre-built packages are more than sufficient.
{ToC}
What's changed in 2026
A lot has happened since this article was first written. The headline changes worth knowing about before you do anything else:
- Version 6.15 is current. The old article referenced 5.42 from 2018. The project has moved on considerably, celebrating its thirtieth anniversary in 2022
- Wayland support has arrived — with caveats. XScreenSaver 6.11 introduced preliminary Wayland support, so the blanket warning that "XScreenSaver won't work on Wayland" is no longer accurate. That said, Wayland support is still maturing and you may encounter rough edges depending on your compositor and Ubuntu version. X11 sessions remain the most reliable experience.
- Android is no longer on Google Play. The developer's Google Play account was deleted after a dispute in which Google demanded a copy of the developer's driving licence. The APK is available directly from the author's website. An unofficial F-Droid build exists but is not uploaded or endorsed by the developer.
- macOS now includes 270+ savers. The macOS build has grown substantially and integrates cleanly with the system screensaver panel in System Settings.
- No Windows version exists, and none is planned. If you were hoping for that, it is not coming.
Ubuntu Linux — Installing XScreenSaver
For most people, the package manager is the right starting point. Be aware, though, that Ubuntu's default repositories ship an older version of XScreenSaver. If you want version 6.15, your best route on a Debian-based system is the Debian unstable repository, which does carry current .deb packages. Red Hat, Fedora, and CentOS users can find recent builds at rpmfind.net.
For a straightforward Ubuntu install from the standard repositories:
$ sudo apt-get install xscreensaver xscreensaver-data-extra xscreensaver-gl-extraOnce installed, you need to add XScreenSaver to your startup applications so it launches automatically when you log in:
- Click 'Show Applications' in your application dock
- Search for 'Startup Applications Preferences' and open it
- Click Add and enter XScreenSaver in the Name field and xscreensaver -nosplash in the Command field
- Click Add to save the new startup entry
Startup Applications Preferences — Ubuntu


To open the XScreenSaver settings and choose your hack, run xscreensaver-settings from a terminal (in older versions this was xscreensaver-demo). I have spent more time than I care to admit choosing between Sonar — which can display live ping response times across your subnet — and UnknownPleasures, the beautiful pulsar-waveform animation lifted from the Joy Division album artwork. With 270+ hacks available in the current release, you will find something that suits you.
Run xscreensaver-settings to open the XScreenSaver preferences panel

XScreenSaver for Android
XScreenSaver is no longer available on Google Play. The developer's account was deleted after Google insisted on a copy of his driving licence as part of a policy enforcement action — a demand he declined to comply with. The APK for version 6.15 is available directly from the author's website at jwz.org/xscreensaver/download.html. You will need to allow installation from unknown sources in your Android settings.
An unofficial build does appear on F-Droid, but it is not uploaded by the developer and should be treated accordingly. If you want the real thing, go to the source.
XScreenSaver is no longer available on Google Play. Google deleted my account because I refused to give them a copy of my driver's license.
Not every hack works on every Android device, but the majority run well. The Android version functions as a live wallpaper and a daydream, giving you a couple of ways to enjoy it.
XScreenSaver for Android — UnknownPleasures and other hacks


XScreenSaver for iOS
XScreenSaver for iOS remains free on the App Store and is the most friction-free way to get it on any platform. Search for XScreenSaver or use the direct link: XScreenSaver on the App Store. Not every hack is available on iOS, but a substantial selection runs beautifully on modern iPhones and iPads.
XScreenSaver for iOS — UnknownPleasures and Sonar hacks


XScreenSaver for macOS
The macOS version is distributed as a DMG from the developer's website — it is not on the Mac App Store and almost certainly never will be. Download xscreensaver-6.15.dmg from jwz.org/xscreensaver/download.html. It requires macOS 10.13 (High Sierra) or newer, so any Mac running a current or recent version of macOS is supported.
Once installed, the hacks integrate directly into macOS System Settings under Screen Saver, exactly as you would expect. With 270+ savers included, the macOS build is the most fully featured version of XScreenSaver on any platform. The native macOS screensaver selection, by contrast, has barely changed in years — XScreenSaver is a significant upgrade.
XScreenSaver for macOS — download and UnknownPleasures hack


A note on source code
XScreenSaver does not have a public source code repository on GitHub or anywhere similar. The developer distributes releases as tar files — the current source is xscreensaver-6.15.tar.gz, available from the download page. If you want to build from source on Linux, that is your starting point. It is the right approach if you need features or fixes ahead of what your distribution packages, but for most people the pre-built options are entirely sufficient.
XScreenSaver is the most popular screensaver collection in the world, and has been in continuous development since 1992.
- Details

In 2026, many developers are still wary of proprietary licenses and telemetry, which is why VSCodium remains a popular choice among open-source enthusiasts who prefer a more transparent coding environment.
While the source code for Visual Studio Code (VSCode) is open-source, the pre-packaged version provided by Microsoft includes telemetry and tracking, prompting many to seek alternatives. Fortunately, you can clone and build the source code under the OSI-approved MIT license. However, for most, the hassle of compiling is unnecessary — enter VSCodium, a community-driven, freely-licensed binary distribution of VSCode that eliminates the telemetry concerns.
Open-source licenses comply with the Open Source Definition, allowing software to be freely used, modified, and shared. For a license to be approved by the Open Source Initiative (OSI), it must pass their rigorous review process.
TL;DR – Compiling the open-source version is a distraction for many. Thankfully, VSCodium simplifies the process, providing a hassle-free alternative that is fully compliant with open-source principles.
{ToC}
Telemetry and Tracking
Despite its efforts to minimize tracking, some telemetry may still be present in VSCodium. Additionally, each extension you install could introduce new tracking vectors. The project's documentation provides guidance on identifying and disabling unwanted telemetry features.
The VSCodium project replaces Microsoft's update services with its own, ensuring that extension updates come from the Open VSX registry rather than the vendor's marketplace.
Proprietary Tools and Extensions
Some proprietary extensions are restricted to Microsoft's version of VSCode, but many open-source alternatives exist. Most extensions, including those for Flutter, are compatible with VSCodium, making it a versatile choice for developers.
Open VSX Registry
The Open VSX Registry serves as a community-driven, fully open platform for publishing VSCode extensions, built on Eclipse Open VSX. This ensures a vendor-neutral, open-source environment that promotes trust and collaborative governance.
Flutter and VSCodium
Installing Flutter Support in VSCodium
Follow the Set up an editor instructions for Visual Studio Code, as they apply directly to VSCodium.
- Start VSCodium.
- Navigate to Command Palette from the View menu.
- Type "install" and select Extensions: Install Extensions from the dropdown.
- Search for "flutter" in the extensions field, select Flutter, and click Install — this will also install the required Dart plugin.
- Open the Command Palette again and select Flutter: Run Flutter Doctor.
- Check the output pane for any issues related to Flutter and resolve them as needed.
- Restart VSCodium and ensure a running simulator or connected device appears in the status bar.
Editing, Running, and Debugging Your Code
The Flutter extension enhances your coding experience with features like syntax highlighting, code completion, and type declaration navigation. The Problems menu item provides a line-by-line analysis of any issues found in your code.
For debugging, you can utilize Flutter DevTools alongside VSCodium's built-in debugging capabilities. Flutter's stateful hot reload is supported, allowing for rapid iteration during development. For more details, check out Using hot reload.
Below are screenshots showcasing VSCodium building and running a Flutter application on macOS, connected to an Android device.
 A Flutter project with the Flutter DevTools open
 Flutter-based Android app with visible baselines
What's Changed in 2026
In 2026, VSCodium continues to evolve as a robust alternative to Microsoft's proprietary offerings. The project has made strides in improving installation methods across platforms, including support for Windows Package Manager (WinGet) and Snap for Linux. Users on Parrot OS, Debian, Ubuntu, and Arch Linux can easily install VSCodium, with Parrot OS even pre-installing it from their official repositories. This enhances accessibility and encourages wider adoption among developers who prioritize open-source solutions. For macOS the simplest installation is via Homebrew using brew install --cask vscodium.
- Details